
Recessed lighting has become a staple in modern homes, and for good reason. These fixtures sit flush against the ceiling, creating a clean, uncluttered look that works with nearly any design style. Unlike pendant lights or chandeliers that command attention, recessed fixtures blend into the background while providing even, practical illumination. Whether you’re renovating a kitchen, brightening a living room, or adding polish to a hallway, recessed lighting offers flexibility and sophistication without breaking the budget. In 2026, homeowners are increasingly turning to recessed fixtures to maximize light while maintaining visual minimalism. This guide walks you through three practical ideas, installation tips, and honest talk about what it takes to get the job done right.
Table of Contents
ToggleKey Takeaways
- Recessed lighting provides a clean, uncluttered aesthetic while delivering practical illumination for kitchens, living spaces, hallways, and bathrooms without visual bulk.
- For kitchen task lighting, space 4-inch recessed fixtures 4 to 6 feet apart above countertops and islands using 3000K color temperature and 90+ CRI bulbs to eliminate shadows and ensure accurate food prep visibility.
- Ambient ceiling lighting in living rooms works best with recessed fixtures arranged in a grid at 3-foot intervals for 9-foot ceilings, paired with dimmer switches and layered with other light sources for mood versatility.
- Bathrooms and hallways require IC-rated and waterproof recessed fixtures rated IP44 to prevent moisture damage and ensure code compliance, making professional installation worth the $150–$300 per fixture investment.
- LED recessed lighting uses only 10–15 watts per fixture and lasts 25,000+ hours, delivering significant energy savings compared to older incandescent versions that consumed 60+ watts and required frequent replacement.
- Thorough planning—measuring ceilings, locating joists, and verifying electrical capacity—is essential before installation; hiring a licensed electrician for rough-in and wiring work ensures safety and code compliance.
What Is Recessed Lighting and Why It Works for Modern Homes
Recessed lighting, also called downlights or can lights, consists of a fixture housing mounted inside the ceiling cavity with only the trim ring visible from below. Light is directed downward and outward, creating functional illumination without visual clutter. The fixture itself sits between ceiling joists (in retrofit applications) or within the ceiling plane during new construction.
These lights come in standard sizes: 3-inch (75mm) and 4-inch (100mm) diameters are most common, with 5- and 6-inch options for larger spaces. Smaller fixtures suit tight ceiling cavities and accent lighting, while larger ones offer better light output and are ideal for task areas.
Recessed lighting works because it solves several design challenges at once. It eliminates the visual weight of hanging fixtures, making rooms feel more spacious. It allows precise light placement for work zones and creates layers of lighting when combined with other sources. For modern homes prioritizing clean lines and uninterrupted sightlines, recessed fixtures are nearly invisible yet highly effective.
Dimmer-compatible LED recessed lights have made these fixtures energy-efficient and long-lasting. A typical LED recessed light uses 10–15 watts and lasts 25,000+ hours, compared to older incandescent versions that drew 60+ watts and needed frequent replacement.
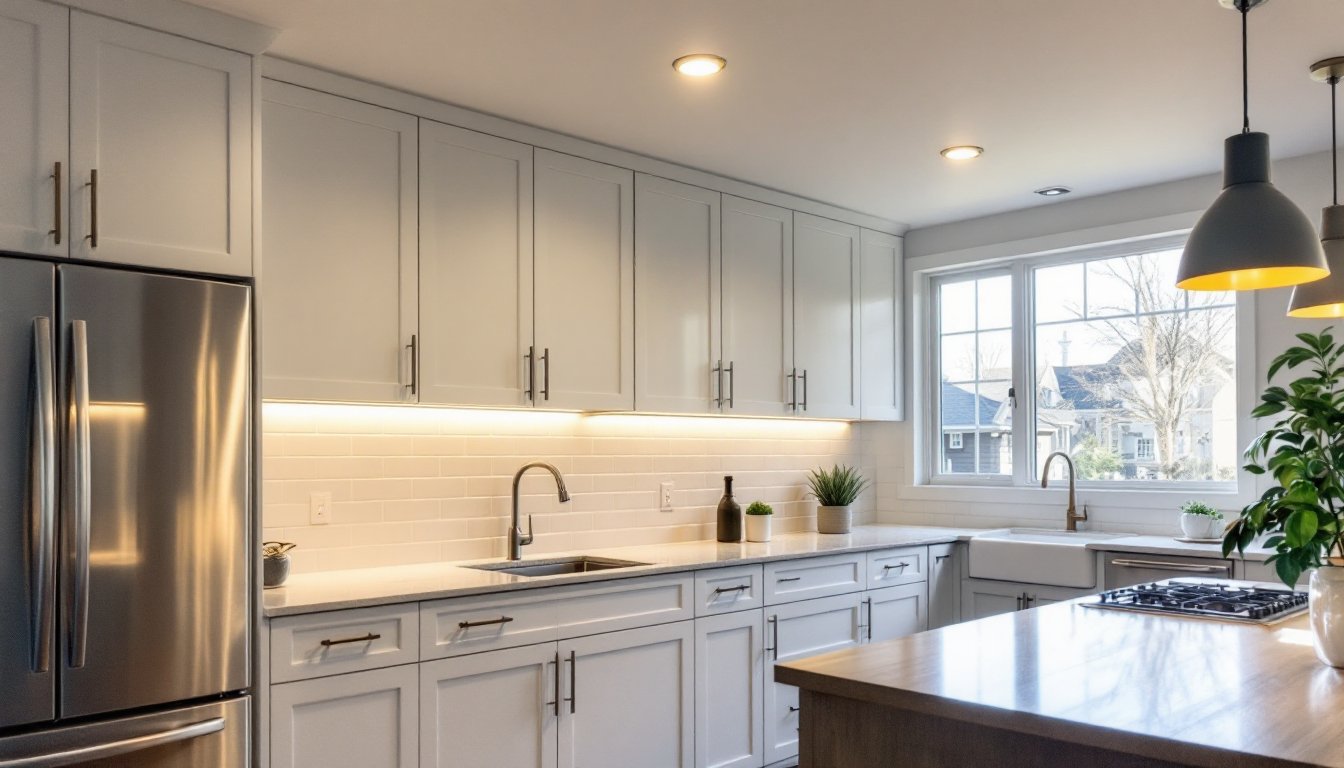
Idea 1: Kitchen Task Lighting With Recessed Fixtures
The kitchen is where recessed lighting earns its keep. Place fixtures directly above countertops, islands, and sink zones to eliminate shadows and make prep work easier and safer. Plan spacing carefully: for standard 9-foot ceilings, space 4-inch fixtures 4 to 6 feet apart in rows parallel to the countertop. Over an island, a single row centered over the work surface is typical: for galley kitchens, parallel rows work best.
For task lighting, choose 3000K color temperature (warm white) to avoid the harsh clinical feel of cooler lights while still providing crisp visibility. Pair these with 90+ CRI (Color Rendering Index) bulbs, this measures how accurately colors appear under the light, crucial for food prep and cooking.
Use trim rings with baffles or reflectors rather than open trims in kitchens. Baffles reduce glare bouncing off countertops and backsplashes. For above-counter lighting, wall sconces or under-cabinet strips can supplement recessed lights, creating a layered scheme that’s both functional and welcoming.
Recessed fixtures in kitchens must be rated for insulated ceilings (check the label for an “IC-rated” housing). If your kitchen sits below an unconditioned attic, this prevents heat loss. Installation typically requires cutting 4-inch holes and running electrical to each fixture, often a two-person job. Many DIYers hire an electrician for this portion and handle trim and bulb installation themselves, balancing cost and safety.
Idea 2: Ambient Ceiling Lighting for Living Spaces
Living rooms, bedrooms, and family spaces benefit from recessed fixtures arranged to provide soft, even overhead light without harsh shadows. For ambient lighting, spread fixtures in a grid pattern across the ceiling. A common formula: for 9-foot ceilings, place 4-inch fixtures at 3-foot intervals in a grid: adjust spacing for higher or lower ceilings and room size.
Ambient recessed lighting is less about intensity and more about distribution. Choose 2700K color temperature for warm, inviting light. Pair these with dimmer switches (ensure bulbs are dimmer-compatible) so users can adjust brightness from energetic to cozy in the same space. The investment in dimmer-rated LED fixtures and controls pays off in flexibility and mood versatility.
According to design guidance from platforms like Remodelista, living spaces benefit most when recessed lights are combined with layered sources, a table lamp in a corner, sconces on a feature wall, or indirect lighting behind floating shelves. Recessed lights serve as the backbone, then other fixtures add character and focus.
Consider the ceiling height and finish. Flat ceilings showcase recessed lights cleanly: vaulted or coffered ceilings complicate placement. Sloped ceilings require angled trims or adjustable fixtures designed for non-level surfaces. Plan fixture placement before cutting, and verify joist locations with a stud finder to avoid cutting through framing.
Idea 3: Accent and Architectural Lighting for Hallways and Bathrooms
Hallways and bathrooms are often overlooked in lighting plans, but recessed fixtures excel here. In hallways, a single row of recessed lights spaced 4 to 6 feet apart along the centerline provides even, safe passage. Use 3000K to keep the space inviting rather than institutional. Smaller 3-inch fixtures work well in narrow hallways where ceiling space is tight.
Bathrooms demand bright, flattering light for grooming tasks. Recessed fixtures above and around the vanity mirror are standard, paired with a dedicated vanity light strip. Overhead recessed lights at 4000K (neutral white) are crisp without being harsh: some designers warm this to 3000K with dimmers for evening use. Over the toilet and shower, IP44-rated waterproof fixtures are required by code to prevent moisture damage.
For accent lighting, position recessed fixtures to highlight architectural features: angled to graze a textured wall, aimed at artwork, or focused on shelving. Bob Vila’s guides emphasize that accent lighting at 45-degree angles creates shadow and depth, adding visual interest without appearing staged.
Bathroom installation typically involves IC-rated, waterproof housings and GFCI protection on circuits. Moisture in the ceiling cavity can damage non-rated fixtures, so this isn’t a shortcut area. Many homeowners partner with a licensed electrician for bathroom and hallway work to ensure code compliance and safety. The cost, usually $150–$300 per fixture installed, is modest insurance against failures and safety issues.
Installation Tips and Best Practices for DIY Success
Before cutting any holes, plan on paper. Measure your ceiling, locate joists and plumbing with a stud finder and moisture meter, and sketch fixture locations. Verify electrical capacity at your breaker panel: adding multiple recessed lights may require a new circuit if existing load is high. This is one area where code varies by jurisdiction, consult your local building authority if wiring new circuits.
Mark center points for each fixture hole. Use a drywall saw or hole saw bit sized exactly for your fixture (4-inch holes for 4-inch fixtures, etc.). Work from below the ceiling for accuracy. Wear safety glasses to protect eyes from drywall dust and debris.
Wiring runs between fixtures along joists if possible: use 14-gauge or 12-gauge NM cable (Romex) depending on breaker amps. Secure cable every 16 inches with staples and 6 inches of slack at each junction box. Do not run electrical across or through joists where foot traffic occurs, use conduit for protection.
Install housings, push them up flush with the ceiling plane, and secure per instructions (friction clips or screws, depending on type). Run circuits through a separate breaker if possible: never overload existing lines. Dimmer compatibility matters: confirm LED bulbs are rated for your dimmer switch, or choose dimmer-compatible fixtures with integrated drivers.
Trim rings and bulbs go in last. A recent discussion on Fine Homebuilding highlighted that 3-inch fixtures work better than larger sizes in tight, confined ceiling spaces and can deliver sufficient light for accents and task areas when positioned correctly.
When in doubt, especially with electrical or waterproofing, hire a licensed electrician for rough-in work. This protects both safety and warranty. Many professionals charge hourly rates ($75–$150/hour depending on region) and can often complete a full kitchen in one day, leaving trim and finishing for the homeowner.
Conclusion
Recessed lighting transforms spaces efficiently, affordably, and with minimal visual fuss. Whether you’re layering task light in a kitchen, creating ambient softness in a living room, or adding polish to hallways and bathrooms, these fixtures adapt to your needs. Start with honest assessment: cosmetic projects (trim and bulbs only) suit DIY: electrical and moisture-rated work may warrant professional help. Plan thoroughly, measure twice, cut once, and don’t skip safety or code requirements. The result is clean, modern lighting that serves your home quietly and effectively for years to come.


