
If you’re planning a ceiling renovation or refreshing a dated room, recessed lighting might be on your radar. But here’s the catch: not all recessed lights are created equal, and installing the wrong type can void your homeowner’s insurance or create a fire hazard. Enter IC-rated recessed lighting, the difference between a DIY project that works safely for decades and one that requires a costly professional redo. This guide walks you through what IC rating means, why it matters, and how to install it correctly so your retrofit holds up under real-world conditions.
Table of Contents
ToggleKey Takeaways
- IC-rated recessed lighting is engineered to sit directly against insulation safely, preventing fire hazards and code violations that non-IC fixtures cannot handle in insulated ceilings.
- IC recessed lighting costs $20–$40 per fixture versus $8–$15 for non-IC models, but the upfront investment avoids expensive retrofits costing $500+ per fixture if code violations occur later.
- Pair IC-rated fixtures with modern LED trim kits to reduce energy consumption by 80% compared to halogen and achieve lasting performance with 25,000+ hour bulb life.
- Proper spacing for IC recessed lights depends on fixture size: 4-inch cans should be 4 feet apart for ambient light or 2–3 feet for task lighting, while 6-inch fixtures work well at 6–8 feet apart.
- DIY installation of IC recessed lighting is achievable for most homeowners but requires careful electrical work; if you’re uncomfortable with wiring junction boxes or live circuits, hire a licensed electrician to ensure safety compliance.
What Is IC Recessed Lighting and Why It Matters
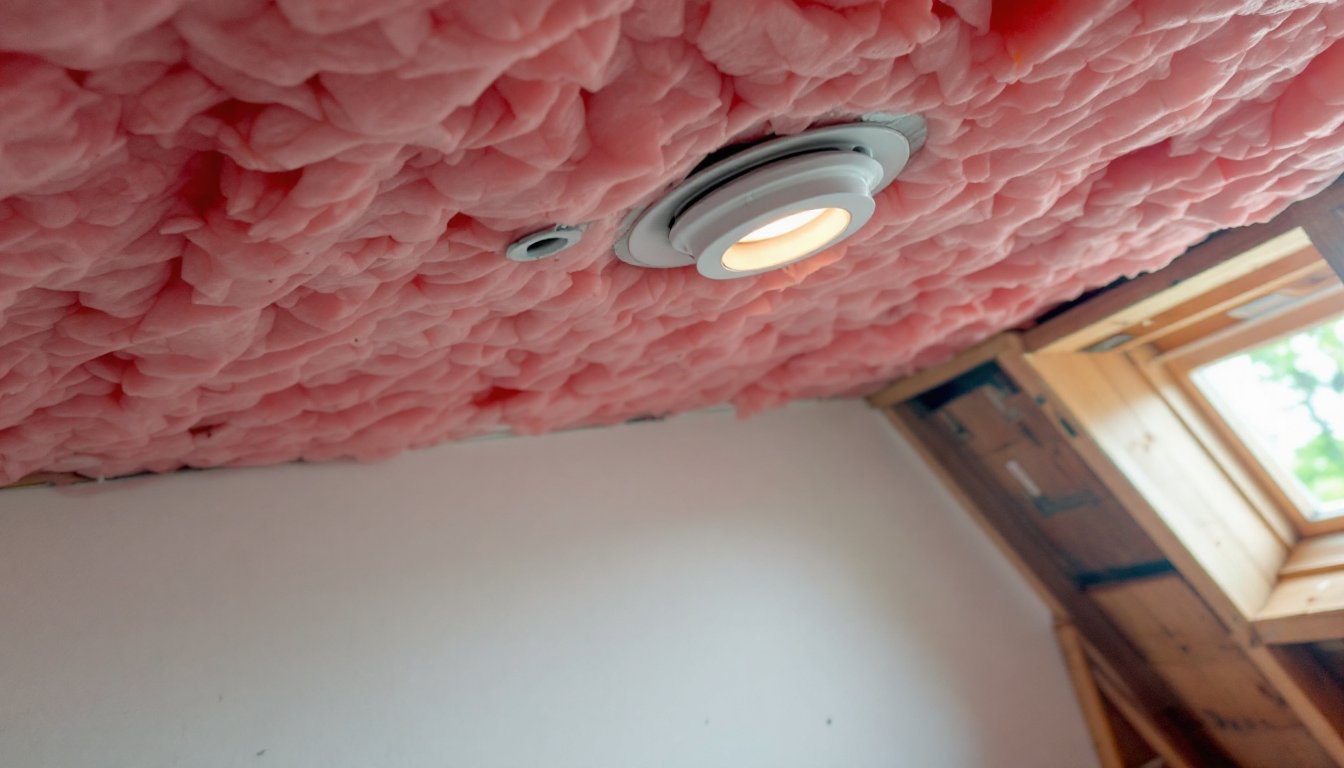
IC stands for Insulation Contact, and it’s a building safety designation stamped into the housing of a recessed light fixture. An IC-rated fixture is designed to be in direct contact with insulation, think fiberglass batts, blown cellulose, or spray foam in your attic or wall cavities. Non-IC fixtures must be kept at least 3 inches away from insulation, which defeats the purpose if your whole attic is insulated.
Why does this matter? Recessed lights generate heat. A non-IC fixture sitting flush against insulation acts like a heating element wrapped in a blanket: it can overheat, melt the fixture housing or wiring, and potentially spark an electrical fire. Building codes take this seriously. The National Electrical Code (NEC) explicitly covers recessed lighting (Article 410.2), and most jurisdictions adopt these standards. Homeowners who install non-IC lights in insulated ceilings and later try to sell often face inspection failures or costly replacements.
IC-rated fixtures are engineered with thermal protection, better air circulation, or heat-limiting devices so they won’t overheat even if insulation piles against them. You might pay a bit more upfront, but you’re buying safety and code compliance.
Key Benefits of IC-Rated Recessed Lights
Beyond meeting code requirements, IC-rated recessed lights offer real advantages for modern homes. First, they let you insulate your ceiling fully, which improves energy efficiency. A sealed attic with proper insulation reduces heating and cooling load, something that adds up over a 30-year mortgage.
Second, they’re designed for durability. IC-rated housings use premium materials (often aluminum or ductile iron) that withstand heat cycling better than budget non-IC models. You’re not replacing fixtures every five years when heat damage compounds.
Third, IC-rated cans often come pre-wired with better junction boxes and thermal cutoffs. Many modern IC fixtures include LED trim kits rated at 2700K or 3000K color temperature, so you get warm, flattering light without the energy draw of older incandescent or halogen versions. On average, LED recessed lights use 80% less energy than halogen and last 25,000+ hours, that’s decades between replacements.
Finally, if you’re in a climate with hot attics (Southern or Western states), IC rating is non-negotiable. Attic temperatures can exceed 150°F in summer, and non-IC fixtures simply can’t handle it.
IC vs. Non-IC Recessed Lighting: What’s the Difference
Understanding the practical differences helps you make the right call for your project.
Non-IC Recessed Lights:
- Cheaper upfront (typically $8–$15 per fixture housing).
- Require 3-inch clearance from insulation in all directions.
- Overheat if insulation contacts them: can melt wiring or housing.
- Work fine in uninsulated spaces like porches, garages, or soffit overhangs.
- Failing to maintain clearance may violate local code and void insurance.
IC-Rated Recessed Lights:
- Higher initial cost ($20–$40+ per housing, depending on size and material).
- Can sit directly against or within insulation safely.
- Built-in thermal protection or heat-limiting devices prevent dangerous temperatures.
- Fully compliant with NEC and modern building codes.
- Better long-term durability and efficiency, especially in insulated attics.
The cost difference sounds significant until you factor in a retrofit down the road. If you install non-IC lights and later need to replace them (due to code violations or damage), you’re looking at cutting drywall, rewiring, and patching, easily $500+ per fixture in labor. IC-rated fixtures cost maybe $150 more total, but you avoid that nightmare entirely. In other words, recessed lighting installation costs can skyrocket if you choose the wrong type initially.
How to Choose the Right IC Recessed Lights for Your Home
Selecting the right IC-rated fixture involves a few key decisions.
Trim and Finish: IC-rated housings come with different trim options, baffle trim (recessed slots that reduce glare), reflector trim (floods the room with light), gimbal trim (tilts to direct light), or open trim (minimal obstruction). For a kitchen, baffle or reflector trim works best. For accent lighting over artwork, gimbal lets you adjust the beam after installation.
Housing Material: Aluminum housings are lightweight and cost-effective. Steel and ductile iron are heavier but offer superior heat dissipation if you’re in an extreme climate. For most homes, aluminum IC-rated housings are sufficient.
LED vs. Incandescent: If your house was built after 2010 and you haven’t already upgraded, go LED. Modern LED recessed trim kits fit standard IC housings, use a fraction of the power, and don’t generate the heat that triggered IC rating concerns in the first place. Older incandescent and halogen trims still exist and work in IC cans, but LED is the practical choice today.
Damp-Rated or Standard: If you’re installing recessed lights in a bathroom or kitchen where moisture is present, choose damp-rated IC fixtures. Wet-rated fixtures are for showers or exterior soffits, overkill for most kitchens but useful if you’re very humid.
Sizing and Spacing Considerations
Recessed lights come in two standard sizes: 4-inch and 6-inch (referring to the hole diameter in the ceiling). A 4-inch fixture is more discrete and fits tighter layouts: 6-inch cans throw more light and suit larger rooms. Spacing depends on ceiling height and the room’s purpose.
For a standard 8-foot ceiling with a 4-inch fixture, space them roughly 4 feet apart for general ambient light (aim for one fixture per 25–30 square feet). If you want brighter task lighting over a kitchen counter, space 4-inch cans 2–3 feet apart. If you’re using 6-inch fixtures, you can space them 6–8 feet apart and still achieve even coverage.
Before buying, measure the joist spacing in your attic or crawlspace. Standard framing uses 16-inch centers: if joists are tighter (12-inch), you have fewer options for placement. Talk to a supply clerk or check the fixture’s spec sheet to confirm it fits your framing.
Also verify ceiling assembly. If your drywall is hung directly onto joists (standard), you can drill and cut freely. If you have plaster or a dropped soffit, you may need additional framing or a drywall saw to avoid tearing into hidden HVAC ducts or plumbing. When in doubt, check the joist layout from above before cutting.
Installation Tips for DIY Success
Installing recessed lighting is a manageable DIY job if you follow best practices. Here’s what works:
Before You Start:
- Turn off power to the circuit where you’ll work. Use a non-contact voltage tester to confirm the wire is dead.
- Plan the layout on paper. Mark each fixture location from below using a stud finder and a pencil so you don’t cut into a joist.
- Rent or borrow a drywall saw (a specialized hole saw for recessed lights) from a tool library or home center. It’s cheaper than a jigsaw and cuts cleaner holes.
Cutting and Framing:
- Use the drywall saw to cut each 4-inch or 6-inch hole to the fixture manufacturer’s specs. Wear safety glasses and a dust mask: drywall dust is not fun to inhale.
- Once the hole is cut, check for obstructions (joists, pipes, wires). If a joist blocks the hole, you’ll need to install a header bracket, a metal frame that attaches to the joists on either side and lets you position the fixture between joists. Headers add 10–15 minutes per fixture.
- Secure the fixture housing in the hole using the built-in clips or mounting brackets. Make sure the housing sits flush to the drywall.
Electrical Work:
If you’re extending power from an existing switch, use 12 or 14 gauge Romex (depending on your circuit’s amperage, check your panel or hire an electrician to confirm). Run the wire through the attic or walls to each fixture junction box. Connect the live (hot), neutral, and ground wires using wire nuts rated for the gauge you’re using. If you’re not comfortable working with live circuits or junction boxes, hire a licensed electrician. This isn’t the place to improvise: electrical mistakes cause fires.
Most modern IC housings come with a junction box already attached, which simplifies wiring. Older models may require a separate junction box mounted on the housing. Either way, keep connections tight and supported.
Trim and Finishing:
- Once the housing is secure, install the trim (baffle, reflector, or gimbal). Press the trim ring gently into the housing until it snaps.
- Insert the LED trim kit (bulb, socket, and reflector assembly). Most modern kits twist in clockwise until they lock. Confirm the wire from the trim connects to the housing’s junction box.
- Test each light before you move on. Flip the breaker back on, flip the switch, and verify the light comes on without flickering.
Insulation and Attic Work:
Once lights are installed and tested, ensure insulation is blown or placed around the IC housings. The thermal cutoff inside the fixture will shut the light off if it senses overheating, but proper insulation placement (no compacting around the can) ensures optimal airflow and longevity. Avoid piling blown-in insulation directly on top of the fixture: instead, create a small air pocket around it.
Safety Reminders:
- Wear goggles and a dust mask when cutting drywall or working in fiberglass insulation.
- Wear gloves if you’re handling fiberglass: it itches and can irritate skin.
- If working in the attic, watch your step. Stepping through drywall between joists is a common injury, use a plywood board or attic ladder.
- If you encounter any wiring you don’t recognize or are unsure about, stop and consult a licensed electrician. Fine Homebuilding resources and This Old House guides offer additional construction and electrical safety details if you want to deepen your knowledge.
Most DIYers can handle 4–6 fixtures in a weekend. Larger jobs (12+ fixtures) often benefit from a second pair of hands to pass tools and hold fixtures steady while you wire.
Conclusion
IC-rated recessed lighting is the safe, code-compliant choice for insulated ceilings. Yes, they cost more upfront than non-IC fixtures, but you’re buying durability, energy efficiency, and peace of mind. Pair them with LED trim kits, plan your layout carefully, and don’t skip the electrical safety checks. A weekend of work now beats a costly retrofit or a safety incident down the road. Your future self, and your homeowner’s insurance, will thank you.


