
Under cabinet lighting doesn’t just make your kitchen look sharper, it transforms how you actually work at your counters. If you’ve ever struggled to see what you’re chopping, or wondered why your cooking space feels darker than your mood on Monday morning, this is the fix. IKEA under cabinet lighting offers an affordable, installable-by-you solution that delivers practical brightness and clean aesthetics. Whether you’re starting from scratch or upgrading a dated setup, this guide walks you through why it matters, which IKEA products deliver results, and how to get them up and running without calling an electrician.
Table of Contents
ToggleKey Takeaways
- IKEA under cabinet lighting eliminates shadow zones over counters, improving both cooking safety and efficiency while enhancing your kitchen’s visual appeal.
- MITTLED LED strips and MÖRKRÄCKA track systems are IKEA’s best options for DIY installation, with peel-and-stick strips costing $15–40 and requiring only an outlet connection.
- Proper surface cleaning and secure adhesive application are critical: dry cabinet undersides thoroughly and press firmly every few inches to prevent strips from peeling away within months.
- Cool white (4000K–5000K) temperature suits detailed cooking tasks and color accuracy, while warm white (2700K) creates harmony with traditional kitchen designs—choose one and stay consistent.
- A typical kitchen retrofit needs 3–4 strips covering prep, sink, and stove areas, with total material costs around $60–150, and requires no electrician for peel-and-stick models with standard outlets.
- Maintenance is minimal beyond dusting every six months; common issues like dim sections usually resolve with reseating power connections or cleaning the cabinet surface again if adhesive fails.
Why Under Cabinet Lighting Matters for Your Kitchen
Under cabinet lighting does two jobs at once: it kills the shadow zone directly under your overhead cabinets where you do actual work, and it adds visual depth to your kitchen space. Without it, a standard ceiling fixture leaves the counter in shadow, a classic lighting mistake that makes prep work harder than it needs to be.
Proper task lighting improves both safety and efficiency. You see knife edges clearly, spot cross-contamination risks, and reduce eye strain during long cooking sessions. Beyond function, well-executed under cabinet lighting elevates how your kitchen photographs and feels at night. It’s the difference between a kitchen that looks incomplete and one that feels genuinely finished.
IKEA’s offerings make this accessible to DIYers because they’re engineered for straightforward installation, don’t require running new circuits in most cases (depending on your setup), and cost a fraction of custom high-end solutions. That said, if your kitchen cabinets are old or the counter layout is irregular, you may need to adapt or add custom supports, more on that later.
IKEA’s Best Under Cabinet Lighting Solutions
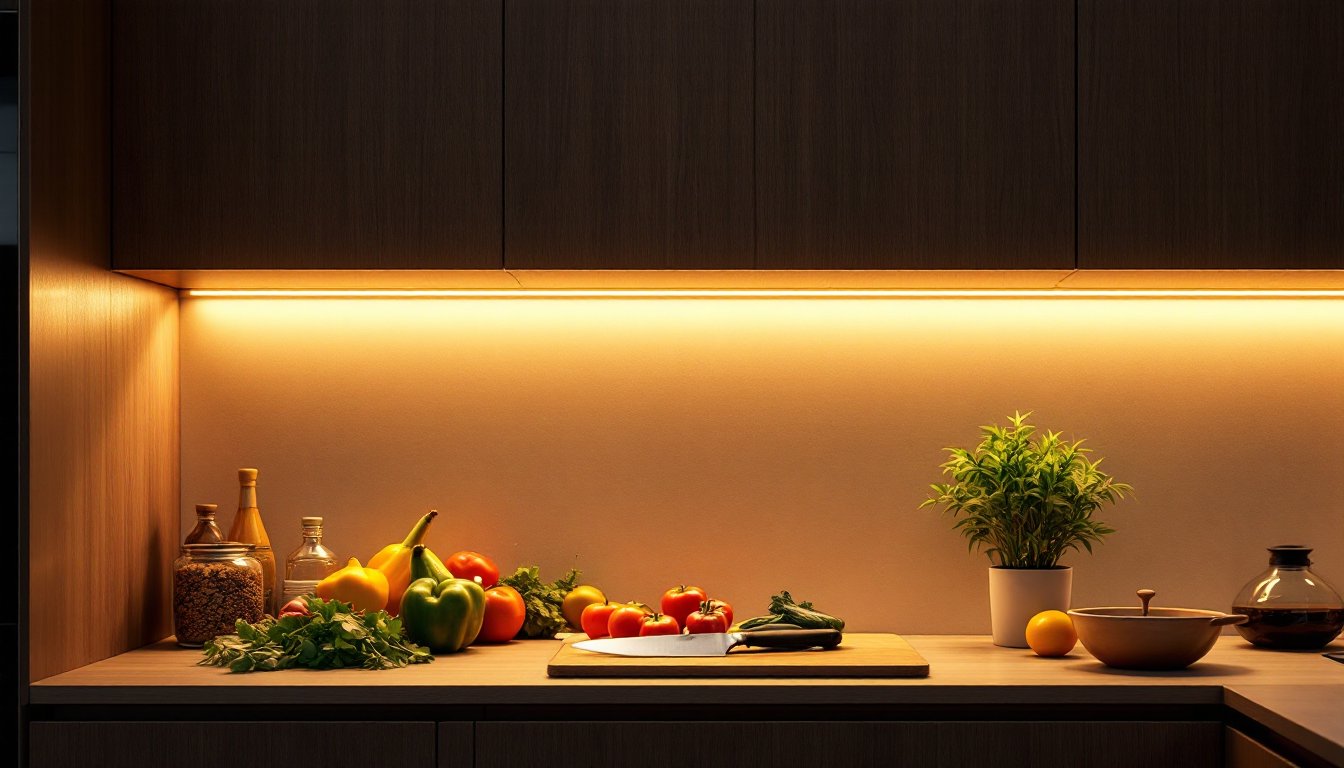
IKEA stocks several lighting strips and fixtures designed for under cabinet use. Their MITTLED LED under cabinet lighting strips come in warm white and cool white, arrive pre-wired with power adapters, and are dimmer-compatible for flexibility. These are the entry point for most DIYers because they’re dead simple: peel-and-stick adhesive backing, plug into an outlet or extension, and you’re done.
Another solid choice is the MÖRKRÄCKA track system, which offers modular spots you can position precisely over work zones. It’s pricier than adhesive strips, but gives you fine-tuned control if your counter layout is busy or irregular.
For renters or those avoiding any permanent changes, RÄVEN clip-on lights mount to the cabinet underside with non-invasive fasteners and angle downward, reversible and portable.
Popular IKEA Options and What to Expect
When shopping IKEA’s lighting aisle (in-store or online), you’ll notice product names change region to region and year to year. In early 2026, the MITTLED series remains the workhorse for most kitchens. Each strip typically runs 20 watts at full brightness, covers about 18–24 inches, and accepts plug-in adapters or hardwired connection if you’re comfortable with that step.
Color temperature matters. Warm white (2700K) suits traditional kitchens and dining areas: it’s forgiving and relaxing. Cool white (4000K) or daylight (5000K) is sharper for task lighting and makes colors pop, ideal if you’re serious about cooking technique. IKEA’s LED strips use roughly 1 watt per strip per inch at maximum, so a typical under cabinet setup draws minimal amperage.
Expect to pay $15–40 per strip depending on length and type. A full kitchen usually needs 3–4 strips minimum if you’re covering the main prep and cooking zones. Price yourself accordingly: a mid-range kitchen retrofit runs $60–150 in materials, not counting any hardware or adapters you might customize.
How to Choose the Right Lighting for Your Space
Start by measuring your counter run and counting how many separate work zones you have. A typical setup covers above the sink, above the main prep counter, and above the stove, three separate strips makes sense. If your kitchen wraps an island or peninsula, add another 1–2 strips.
Think about brightness expectations. If you’re an amateur cook doing weekend dinners, one strip over the main counter might suffice. If you’re a meal-prepper or professional cook working weeknights, you’ll want redundancy and overlap. IKEA’s LED strips max out around 400–500 lumens per unit, which is moderate but adequate if positioned 12–15 inches above the work surface.
Color temperature is a practical choice, not an aesthetic one. Cool white suits kitchens where you need to see detail (sauces, food color, knife control). Warm white works if you’re blending under cabinet lighting with existing warmer overhead fixtures and want visual harmony. Mixing temperatures in the same kitchen looks disjointed, so commit to one before buying.
If you’re renovating and considering kitchen lighting Home Depot options alongside IKEA, note that Home Depot’s under cabinet lines (Lithonia, etc.) are often larger and more industrial-looking, fine for garages or workshops, less refined for visible kitchen spaces. IKEA’s slim profiles suit modern cabinetry better.
Budget also factors in outlet access. If your kitchen has only one counter outlet, you’ll need a power strip or extension cord to daisy-chain strips. Not ideal cosmetically, but workable. Some DIYers hardwire multiple strips to a single junction box hidden in a cabinet, but that crosses into electrical work, call a licensed electrician if you’re not confident.
Installation Steps for DIY Success
The beauty of peel-and-stick IKEA under cabinet strips is that installation is genuinely straightforward. The catch: surface prep determines whether they stay stuck or peel away after three months.
Step 1: Clean the cabinet undersurface thoroughly. Wipe with a damp cloth, then dry completely. If there’s residue, grease, or old adhesive, use a degreaser or rubbing alcohol. Let it dry fully, damp undersides are the #1 reason strips fall off.
Step 2: Measure and mark placement. Position strips roughly 1–2 inches from the front edge of the cabinet so light projects down onto the counter, not into your eyes. Use a tape measure and level. Mark light pencil lines: they’ll be hidden once the strip is up.
Step 3: Peel the backing and press firmly. Start at one end and work across, pressing for several seconds every few inches. Don’t just slap it on, the adhesive needs pressure to bond. If your cabinet undersurface is veneered or plastic laminate, this step is forgiving. If it’s bare plywood or an uneven finish, consider adhesive-backed metal mounting brackets first, then rest the strip in the bracket.
Step 4: Route and secure the power cord. IKEA’s supplied cords are usually 6–10 feet. Run it along the side of the cabinet toward an outlet, or tuck it behind the toekick if possible. Use cable clips (included or inexpensive stick-on clips) to keep it from swinging loose. Never crimp or fold the cord: heat buildup is a fire risk.
Step 5: Plug in and test. Flip the switch or plug the adapter. Light should come on evenly. If one section is dim, check the connection: sometimes the contact pins aren’t fully seated.
Tools and Materials You’ll Need
- Measuring tape and pencil (standard DIY basics)
- Level (a short 12–18 inch level is fine: ensures strips run straight and light projects evenly)
- Degreaser or rubbing alcohol (for cleaning: mineral spirits works too if you have it)
- Cloth (lint-free cloth preferred: paper towels leave residue)
- Adhesive-backed metal brackets (optional, but worth grabbing if your cabinet undersurface is uneven: cost $5–15)
- Stick-on cable clips (2–3 per strip: keeps cords organized)
- Power extension cord (if you don’t have an outlet nearby: avoid daisy-chaining strip adapters)
PPE: You don’t need much here. Wear work gloves if you’re using degreaser, and safety glasses if you’re climbing under cabinets (bumping your head on the cabinet frame is embarrassing and preventable). The LED strips themselves generate minimal heat and don’t require special handling.
If you’re cutting strips to fit custom lengths, IKEA’s LED strips are scored at intervals and snip cleanly with a utility knife or sharp scissors. Exposed copper contacts must not touch water or be left bare: if you cut a strip, cap unused ends or seal with waterproof tape (though most DIYers simply avoid cutting and buy exact lengths).
Maintenance and Troubleshooting Tips
IKEA’s LED strips are tough and require almost no maintenance. No bulbs to replace, no ballasts to fail. Over time, dust collects on the lens, wipe gently with a dry cloth every 6 months to maintain brightness perception. That’s it.
Common issue: Strip won’t turn on. Check the power adapter is plugged in and the outlet works (plug a lamp in to confirm). Check the connection between the strip and the adapter, sometimes the terminal pins aren’t fully inserted. Reseat firmly and test again.
Dim light from one section. Usually a contact issue. Unplug, reseat all connections, and retry. Rarely, a failure in the LED strip itself occurs (defective solder joint), but this is uncommon and IKEA’s warranty covers replacement.
Adhesive failing. If a strip begins lifting, don’t just restick it, clean the cabinet undersurface again with degreaser, let it dry completely, then reapply the strip. If it fails a second time, the cabinet finish may be incompatible: use bracket-mounted strips instead.
Cord management headaches. If your extension cord is visible and bothers you, investigate cabinet-top routing (feed the cord along the top interior of the cabinet toward a rear outlet) or hardwiring via a hidden junction box. The latter requires an electrician: don’t DIY electrical boxes unless you’re licensed.
For smart home enthusiasts, smart home technology solutions now include retrofit dimmer switches and app-controlled adapters compatible with IKEA’s basic LED strips. If you’re curious about smart lighting, brands like Nanoleaf and Wyze make plug-in dimmer adapters ($30–60) that work with standard LED strips and integrate with Alexa or Google Home. Not essential, but a nice upgrade if you’re already invested in a smart kitchen.


