
Outdoor LED lighting has become the standard for homeowners who want to brighten their yards without inflating their electric bills. Unlike incandescent bulbs that waste energy as heat, LEDs convert most of their power into actual light, typically lasting 25,000 to 50,000 hours compared to 1,000 hours for old-school bulbs. Whether you’re lighting a pathway, securing your porch, or creating ambiance on the deck, outdoor LED fixtures offer flexibility, durability, and real cost savings. This guide walks you through choosing and installing the right LED outdoor lighting for your space, so you can enjoy your yard year-round without guessing or overspending.
Table of Contents
ToggleKey Takeaways
- LED outdoor lighting reduces energy consumption by 75–85% compared to incandescent bulbs while lasting 25,000–50,000 hours, delivering substantial cost savings over time.
- LED outdoor lighting comes in multiple types—landscape uplighting, deck sconces, motion-activated security floods, and pathway bollards—each designed for specific functions and requiring different wattage and brightness levels.
- Choose the right color temperature (warm white for ambiance, cool white for security), verify IP65+ weather ratings, and consider low-voltage systems for easier DIY installation and safety.
- For security applications, position floodlights 8–10 feet high on corners and install at least two fixtures to eliminate dark shadows and provide 50–100 foot-candles of illumination.
- Always verify color rendering index (CRI) of 90+ for natural color appearance, and hire a licensed electrician for new 120-volt circuits to ensure code compliance and safety.
- Low-voltage LED landscape lighting systems simplify installation by eliminating deep trenching and permit requirements, making them ideal for pathway and garden lighting projects.
Why LED Outdoor Lighting Is the Smart Choice for Homeowners
LED outdoor lighting pays for itself over time through lower electricity consumption and minimal maintenance. A typical outdoor LED fixture draws 8–12 watts and produces 800–1,200 lumens, while a comparable incandescent or halogen would use 50–75 watts. Over a season of evening use, that difference adds up quickly, especially if you’re running multiple fixtures.
Durability is another massive win. LEDs are built tough for outdoor conditions: they resist vibration, tolerate temperature swings from freezing winters to scorching summers, and don’t flicker when voltage dips. Most outdoor LED fixtures carry a 3-5 year warranty, and the diodes themselves rarely fail before the fixture’s housing corrodes or electrical connections loosen.
Color temperature matters too. LED bulbs come in warm white (2700K), neutral (4000K), and cool white (5000K). Warm white suits intimate spaces like patios and decks: cool white works better for security and task lighting. Unlike incandescent bulbs that only come in one warm tone, this flexibility lets you match the mood to the function. LED Home Lighting Fixtures use the same efficiency gains indoors, making a whole-house transition practical.
Types of Outdoor LED Lighting for Every Space
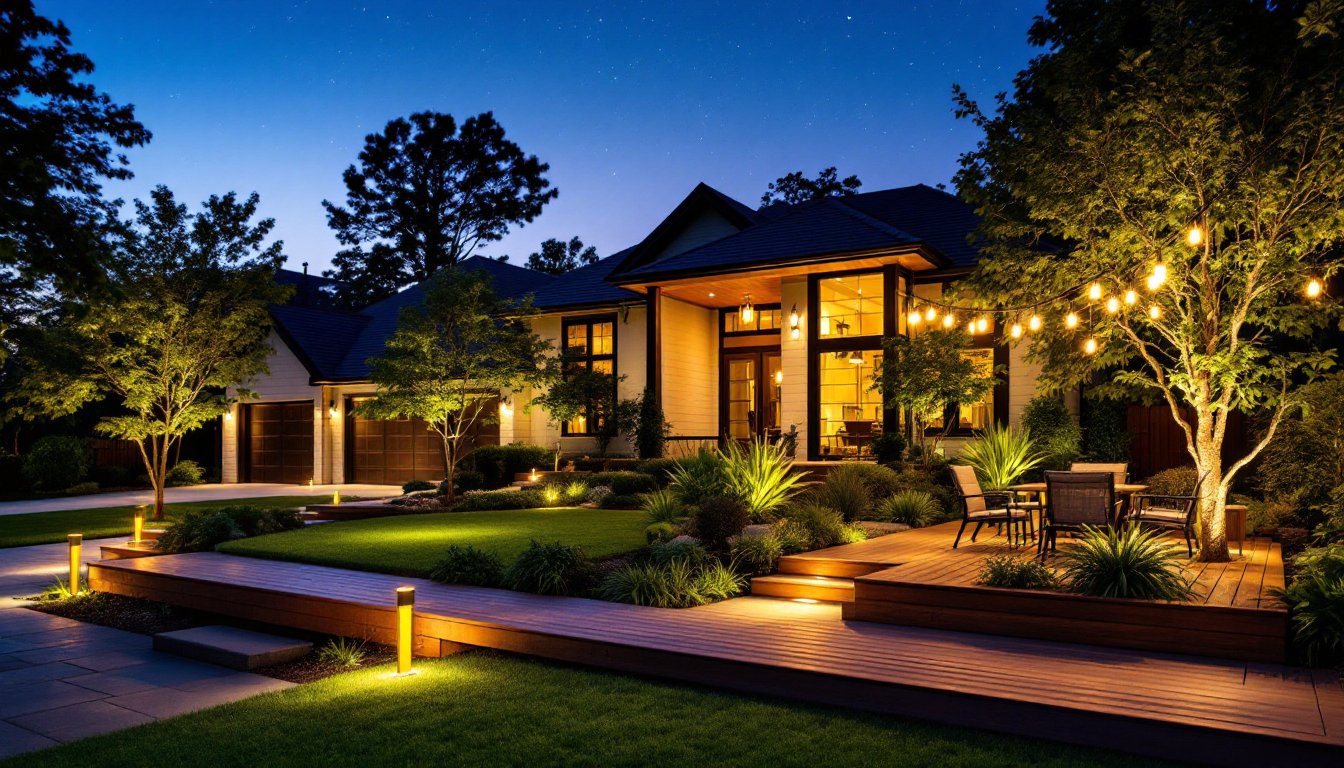
Landscape and Garden Lighting
Landscape LED lights come in two main flavors: uplighting and downlighting. Uplighting mounts low and points beams upward to graze trees, shrubs, or architectural features, it’s dramatic and energy-efficient. Downlighting hangs overhead or mounts on soffit and throws light downward, useful for illuminating pathways or decks. Most landscape fixtures are rated IP65 or IP67 (dustproof and waterproof) and operate on 12-volt or 24-volt systems fed by a low-voltage transformer.
Standard post lights and bollards (short, stubby pathway markers) use simple LED modules and typically run on 120-volt circuits, standard household power. Post lights typically consume 5–8 watts each and cast ambient light 6–10 feet in diameter. Plan spacing every 8–10 feet along walkways for even coverage without pools of shadow between fixtures.
Deck and Patio Fixtures
Deck and patio lighting includes recessed step lights, under-rail lights, and overhead pendant fixtures. Recessed step lights are small LED modules rated IP67, embedded flush into deck risers or fascia to prevent tripping hazards, a simple and elegant touch. String lights (often called Edison-style LEDs) give warm ambiance and are now available in weatherproof IP55-rated versions that handle rain and wind.
Wall-mounted sconces flanking doors or steps add both light and style. Most pull 10–15 watts and mount directly to siding or masonry. Overhead pendants or chandeliers work if you have a pergola, patio cover, or eave to attach them, these typically use dimmable LED bulbs rated A19 or PAR30 and can consume 10–20 watts depending on brightness.
Security and Motion-Activated Lights
Motion-activated floodlights are the workhorse of outdoor security. Modern LED flood fixtures deliver 1,000–3,000 lumens and use 15–30 watts, compared to 100–150 watts for old halogen floods. Sensitivity adjusts so they don’t trigger on every passing car or animal: range typically covers 20–40 feet. Many now include a dusk-to-dawn sensor, so the light only activates after sunset.
Mounting matters: install fixtures 8–10 feet high on corners or above entryways. If you have multiple entry points, plan at least two fixtures to eliminate dark shadows. Smart LED security lights now sync with home automation systems, you can adjust brightness or schedules via app, but they cost more upfront ($50–120 per fixture vs. $20–40 for basic models).
How to Choose the Right LED Lights for Your Outdoor Area
Start by measuring the area and sketching where you want light. A 10×12-foot patio needs different coverage than a 50-foot driveway. Use a light-level calculator or ask yourself: is this a safety pathway (brighter, cooler white) or ambiance seating (softer, warmer white)? Security lights demand 50–100 foot-candles at ground level: pathways need 5–10 foot-candles: ambiance lighting is subjective but usually 3–5 foot-candles.
Check the color rendering index (CRI). A CRI of 90 or higher means colors look natural under the light, important if you care what plants or patio furniture actually look like. Cheap LEDs drop to CRI 70, which makes greens look sickly and reds muddy.
Voltage matters. Low-voltage systems (12V or 24V) are safer for areas where people walk barefoot or kids play, and they’re easier to wire, no permit needed in most jurisdictions. Standard 120-volt outdoor circuits require GFCI protection and often need a permit if you’re adding new circuits. If you’re retrofitting an existing fixture, stick to the voltage it was designed for.
Weather rating is non-negotiable. All outdoor fixtures should be at least IP65 rated (dustproof, water-jet resistant). Fixtures near saltwater or in spray zones need IP67 or higher. Check the product spec sheet, it’ll state the rating clearly. 12 Volt LED Lighting systems are popular for landscape work because they sidestep deep trenching and complex wiring. Also consider whether you need dimmable fixtures: many modern outdoor LEDs dim smoothly, but not all, read the fine print. Some recent studies on outdoor smart lights show that integrating with your home ecosystem offers convenience, though they’re pricier and depend on WiFi reliability.
Installation Tips and Best Practices
Safety first: if you’re adding a new 120-volt circuit, hire a licensed electrician. Outdoor wiring is code-regulated, and mistakes can cause fires or shocks. If you’re upgrading fixtures on an existing circuit or installing low-voltage landscape lighting, you can DIY it.
For low-voltage landscape systems, lay out your path first with a hose or rope so you can visualize spacing. Dig a shallow trench (4–6 inches) from your transformer location to each fixture, no need to go deep since voltage is so low. Run the cable in direct-burial wire rated for outdoor use: don’t cut corners with indoor extension cords. Splice connections using waterproof connectors, never bare wire twisted together. After wiring, cap the transformer and plug it into a GFCI-protected outlet (usually near your patio or back door). Test everything before burying the trench and backfilling.
For deck step lights or under-rail fixtures, mark holes carefully before drilling. Use a stud finder if mounting to fascia over wood framing, you want to hit solid material, not air gaps. For masonry or composite decking, use appropriate anchors (tapcons for concrete, stainless screws for composite).
Wall-mounted sconces and security floods need solid backing. Never mount a heavy fixture to vinyl siding alone, sheath the siding, install a backing board, and attach to studs. Use silicone caulk around penetrations to seal out water. Aim motion-sensor floodlights slightly downward so they illuminate the approach, not directly at eye level (which blinds people).
Before final installation, test all connections in daylight. How to Choose Outdoor Lighting Fixtures covers selection: final setup requires attention to detail. Check that wires don’t cross sharp edges and that you’ve left no exposed connections. Many pros wrap exposed terminals with weatherproof tape for extra insurance. If you’re uncertain about any step, electrical connections, mounting securely, or permitting, consult a local electrician or inspector. It’s money well spent and keeps your family safe.


