
Kitchen islands have become the heart of modern homes, but without proper lighting overhead, they’re just a dark countertop nobody wants to work at. Over-island lighting transforms both function and style, making the space safer for food prep while adding visual interest to your kitchen. Whether you’re installing pendants for the first time or upgrading existing fixtures, understanding your options for over kitchen island lighting ensures you’ll get the right brightness, placement, and aesthetic for your space. This guide walks you through everything a DIYer needs to know about pendant lights, from sizing to installation.
Table of Contents
ToggleKey Takeaways
- Over kitchen island lighting improves both functionality and safety by delivering focused, downward-facing illumination ideal for task work and reducing shadow zones during food prep.
- Choose pendant sizing based on the one-third rule: pendant width should be approximately one-third of your island’s length for balanced visual proportion (e.g., 12–14 inch pendants for a 48-inch island).
- Hang pendants 30–36 inches above the countertop to clear bar stool seating height while directing light downward, with spacing of 24–30 inches apart for even coverage.
- Use 150–300 lumens per foot of island length depending on other light sources and cabinet color, and opt for dimmable LED bulbs to shift between bright task lighting and ambient evening light.
- Secure pendant fixtures directly to ceiling joists with ⅜-inch lag bolts or heavy-duty screws—drywall anchors alone are unsafe—and match pendant finishes to your kitchen’s aesthetic using no more than two complementary metals.
- Verify there’s no plumbing, ductwork, or electrical overhead before installation, and hire a licensed electrician if you’re unsure about identifying live wires or if your home’s electrical infrastructure is outdated.
Why Over-Island Lighting Matters for Your Kitchen
Good lighting over your island does more than look nice, it makes your kitchen functional and safer. Without overhead light, the island becomes a shadow zone where you’re chopping vegetables or reading a recipe in poor visibility. Pendant lights deliver focused, downward-facing illumination that’s ideal for task work.
Beyond task lighting, island pendants anchor the kitchen’s visual design. They draw the eye, create balance, and set the tone for the entire room. A set of three brass pendants reads differently than sleek steel mini-lights or rustic seeded glass, yet they all do the same job. The choice is yours.
Brightness matters too. Island lighting should complement your ambient overhead fixtures (recessed lights, flush-mount fixtures) without overwhelming the space. Most kitchens need 150–300 lumens per foot of island length, depending on your other light sources and the color of your cabinetry. Darker finishes absorb light, so they may need a bit more wattage to feel bright.
Types of Pendant Lights for Kitchen Islands
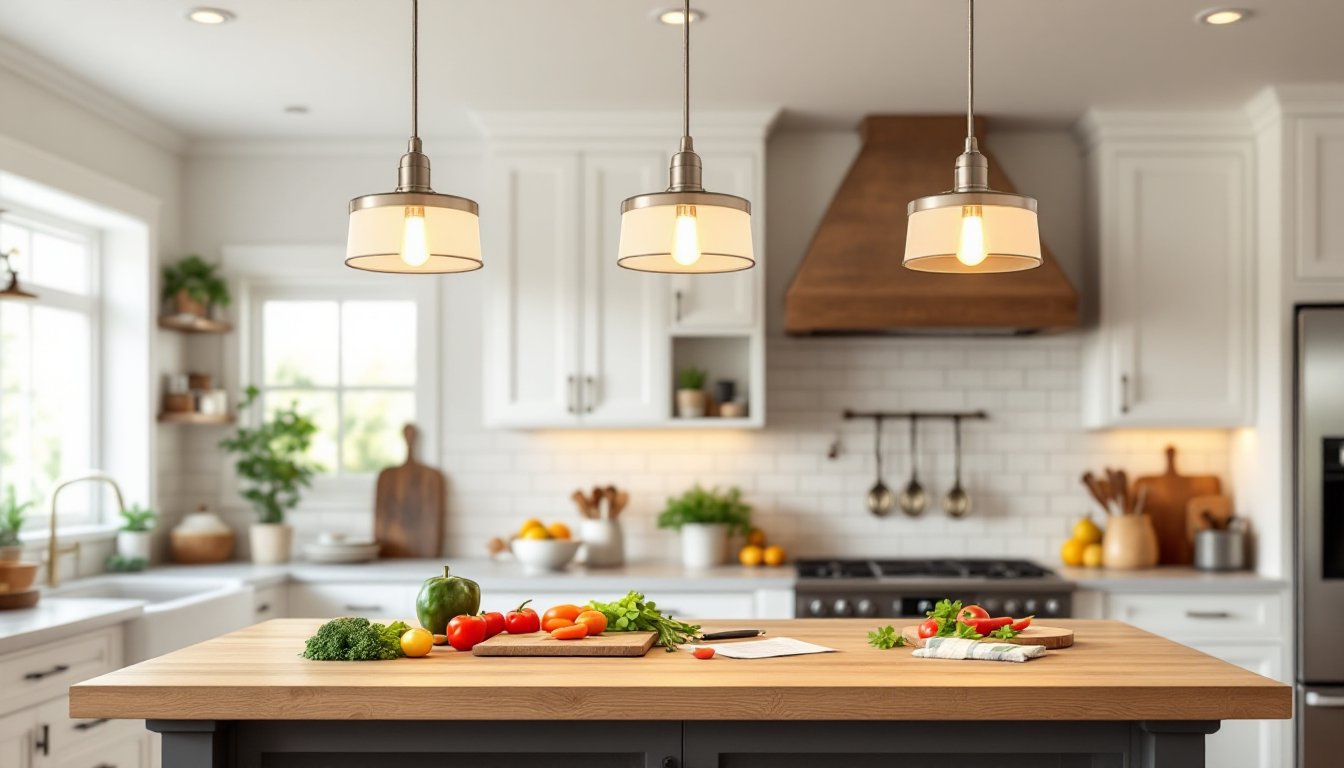
Pendant lights come in three basic styles: mini-pendants (compact heads, 5–7 inches wide), standard pendants (larger shades, 10–14 inches), and statement pendants (18+ inches, designed to stand alone). Mini-pendants work well in rows: standard pendants balance visual weight better in multiples. Statement pieces often work solo or in pairs over longer islands.
Material choices affect both durability and aesthetics. Metal shades (brushed nickel, oil-rubbed bronze, brass) hide dust and are easy to clean, practical for a working kitchen. Frosted or seeded glass diffuses light more evenly and reduces glare. Clear glass looks modern but shows every fingerprint and dust particle. Fabric shades soften light beautifully but aren’t ideal above food prep, they stain and fade easily in kitchen humidity.
Bulb type matters for function and cost. LED bulbs last 25,000–50,000 hours, run cooler, and cost less to operate than incandescent or halogen. Dimmable LEDs paired with a dimmer switch let you shift from bright task lighting to ambient evening light. If a fixture isn’t listed as dimmable-compatible, dimming can cause flickering or shorten the bulb’s life.
Single vs. Multiple Pendant Configurations
A single large pendant works over islands 30–36 inches long if you’re going for drama or have an open kitchen plan with minimal visual clutter. Two pendants suit islands 36–48 inches: three pendants work best for 48–60 inches. The goal is visual balance, too many small lights look cluttered, while too few leave gaps. Space multiple pendants 24–30 inches apart for even coverage and a cohesive look.
Mixed configurations (one large statement light flanked by two smaller accents) are trendy but harder to execute without looking fussy. Stick with uniform sizing and spacing unless you have a very specific design vision. Consistency reads cleaner and feels intentional.
Sizing and Spacing Your Island Pendants
Start by measuring your island’s length. A general rule: choose pendant widths that are one-third the island’s length. An island 48 inches long? Go with pendants about 12–14 inches wide. This proportion feels balanced and isn’t overwhelming.
Height is critical for safety and sight lines. Pendants should hang 30–36 inches above the countertop surface. This clears most people’s heads when seated (standard bar stool height is 24–26 inches) while keeping light directed downward onto the work surface. If your island is in an open floor plan with a 9-foot ceiling, 30 inches is a safe minimum. Vaulted or 10-foot ceilings? You can go to 36–42 inches without looking sparse.
Measure twice before drilling. Mark the center point of your island lengthwise, then work outward to position pendant hangers. Unequal spacing jumps out immediately and ruins the whole effect. Use a level and tape measure, eyeballing it guarantees regret. If your island has a distinct shape (peninsula, angled edges), center the pendants over the actual work surface, not the island’s geometric center.
Installation Tips for DIY Success
Before you cut into your ceiling, confirm there’s no plumbing, ductwork, or electrical already running overhead. Check both above and below if you have basement or attic access. This is the one place I’ll say: hire an electrician if you’re not confident identifying live wires or if your kitchen has outdated or sketchy electrical infrastructure.
Most pendant installations require running electrical wire through the ceiling to a junction box. If an existing fixture is already there, you may reuse that junction box and wire, much easier. If you’re adding pendants in a new location, you’ll need to run new wire from the nearest breaker or existing circuit. Depending on your home’s age and electrical setup, this can be a DIY job (newer homes, accessible attics) or a professional necessity (older homes, plaster ceilings, crowded junction boxes).
For simple swaps where the electrical is already in place: Turn off power at the breaker, test with a voltage detector to confirm the circuit is dead, disconnect the old fixture, and connect the new pendant using wire nuts or a terminal block. Standard color coding applies: black to black (hot), white to white (neutral), bare copper to bare copper (ground). Twist wires together firmly and cap with a wire nut, then tuck everything back into the junction box.
Use a stud finder to locate ceiling joists before securing mounting brackets. Pendant fixtures are heavy (5–15 pounds depending on the shade and bulb type) and must anchor directly to framing, not drywall. Use ⅜-inch lag bolts or heavy-duty screws rated for hanging fixtures. Drywall anchors alone aren’t safe, they’ll pull free under weight.
Wear safety glasses when working overhead. Dust and old insulation will fall, and you don’t want debris in your eyes. If you’re uncomfortable on a ladder or dealing with unfamiliar electrical work, call a licensed electrician. A few hours of professional labor beats a fire hazard or a broken skull.
Style and Design Considerations
Match your island pendants to your kitchen’s overall aesthetic, but don’t obsess over perfection. A modern farmhouse kitchen with shaker cabinets and white subway tile looks great with black metal or brushed nickel pendants. Industrial kitchens suit Edison-style bulbs in cage or geometric shades. Cottage or traditional kitchens pull off vintage-inspired glass or ceramic shades.
Color coordination matters subtly. If your cabinet hardware is brushed gold, brushed gold pendant fixtures tie the room together. Mix metals carefully, a little contrast (e.g., brass and black) feels intentional: too many finishes looks chaotic. Stick to two complementary metals maximum.
Bulbs show. Visible filament bulbs (Edison or vintage-style) are on-trend but add warmth and retro character that may not suit every kitchen. Frosted or opaque shades hide standard bulbs and look cleaner if you prefer minimalism. Clear glass keeps pendants lightweight and airy, great for small kitchens or open plans.
Dimmability enhances mood and energy efficiency. Pair your pendants with a wall dimmer or smart bulbs (Wi-Fi enabled) so you can adjust brightness from your phone or use voice control. This flexibility turns island lighting from a one-note fixture into a design tool. Many kitchen lighting options let you customize both ambiance and function. Pendant styles also coordinate well with under-cabinet accent lighting, which adds another layer of visual interest without competing for attention.
Research options online or in person. Design sites like The Kitchn offer real kitchen photos with lighting in context. Expert reviews such as Bob Vila’s tested pendant light recommendations provide honest performance insights. Walk through home improvement stores to see finishes and sizing in person, photos on screens lie about scale and color. Buying the wrong pendant online is frustrating: seeing it live first prevents buyer’s remorse. If you’re working in a small space or have tricky ceiling height, ceiling lighting solutions from other rooms can spark ideas for how to adapt principles to your island.
Conclusion
Over-island lighting isn’t complicated, but it does require thoughtful planning. Size your pendants to match your island, hang them at the right height for safety and function, and anchor them securely to ceiling joists. Choose finishes and styles that complement your kitchen’s design, then step back and enjoy the brighter, better-looking space you’ve created. A successful installation balances aesthetics with practicality, exactly what a home DIYer should aim for.


