
Under cabinet LED tape lighting is one of the quickest wins in DIY kitchen upgrades. It delivers brighter countertop workspace, adds a modern touch, and costs far less than a full renovation. Unlike recessed can lights or pendant fixtures, LED tape requires no framing, no electrician (in most cases), and installs in an afternoon. Whether you’re working with granite, butcher block, or laminate countertops, adhesive-backed LED strips slip underneath your cabinets to illuminate the space where you actually work, and they look sharp doing it. This guide walks you through selecting the right tape, installing it safely, and powering it without overcomplicating the setup.
Table of Contents
ToggleKey Takeaways
- Under cabinet LED tape lighting provides bright task lighting for countertops in just an afternoon without requiring an electrician or structural modifications.
- Choose an IP65-rated or higher LED tape with appropriate color temperature (2700K for warm/cozy, 4000K for detailed work) and brightness measured in lumens to match your kitchen’s needs.
- Proper installation requires thorough surface cleaning, careful adhesive application in sections, and routing wires neatly along cabinet sides for a professional finish.
- LED tape operates on low voltage (12V or 24V) and requires a transformer to convert standard household current, so invest in a plug-and-play system or compatible power supply rated for your tape’s wattage.
- Creative layouts like dual-height installations under both wall cabinets and kitchen islands, or ambient lighting inside glass-front cabinets, elevate under cabinet LED tape lighting from functional to design-forward.
What Is Under Cabinet LED Tape Lighting and Why It Matters
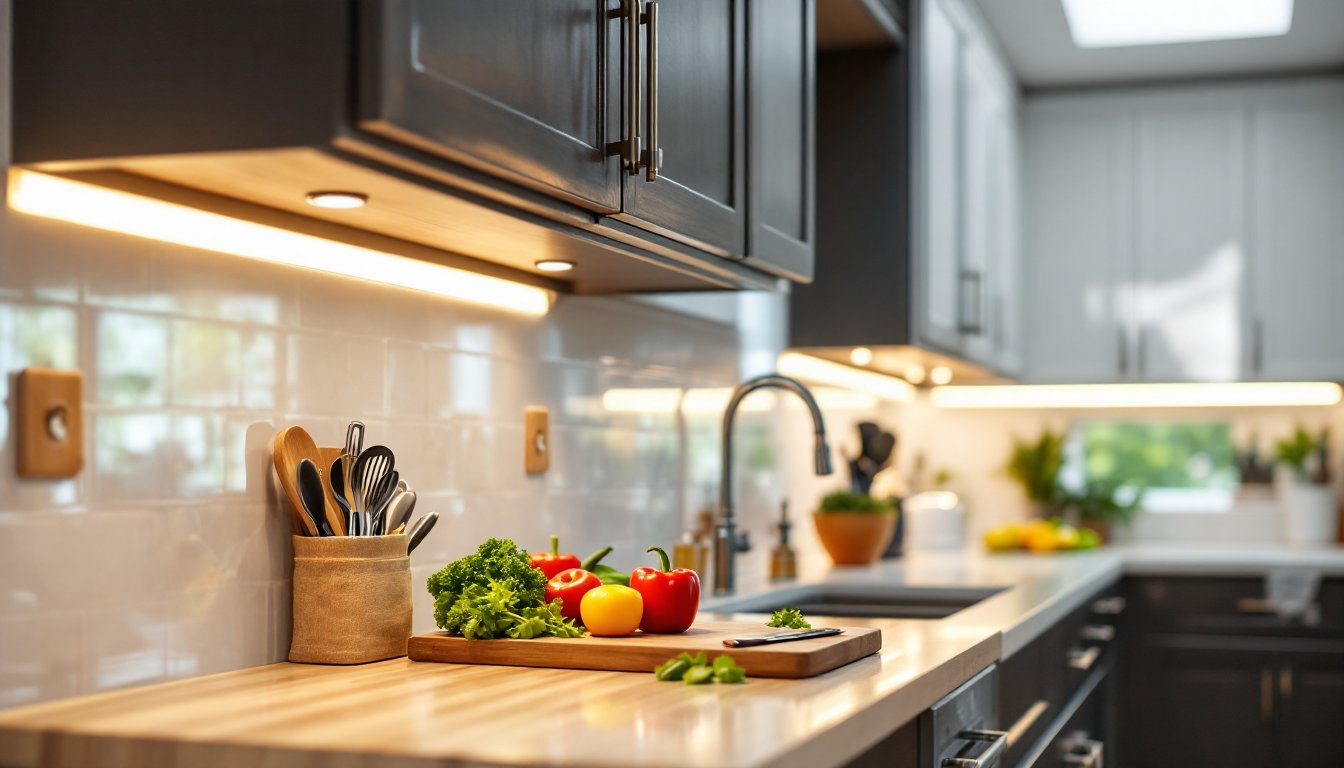
Under cabinet LED tape lighting is a flexible, low-profile light source that runs along the bottom edge of your wall cabinets, shining downward onto your countertops. The “tape” is a circuit board with tiny LED emitters spaced closely together, backed with adhesive that sticks directly to wood, metal, or plastic cabinet undersides. Unlike strip lights you might staple to a basement shelf, kitchen LED tape is designed for aesthetics: clean lines, no visible wires (usually), and a finished look.
Why does it matter? Function first: proper task lighting on countertops reduces eye strain and improves food prep accuracy. You’re not relying on overhead fixtures bouncing light around the room: you’re aiming light exactly where your hands are. Second, it’s cosmetic, the warm or cool glow adds depth to your kitchen, especially at night or during evening entertaining. Third, LEDs run cool and sip electricity compared to incandescent or halogen bulbs, so your monthly bill won’t spike. Finally, installation doesn’t require permits in most jurisdictions (confirm locally), and you won’t damage walls, cabinets, or countertops if you follow basic steps.
The main benefit over other under-cabinet options: traditional recessed fixtures require cutting into cabinet bottoms, running electrical in walls, and often a licensed electrician. LED tape avoids all that complexity while delivering comparable or better light where it counts.
Choosing the Right LED Tape for Your Space
Not all LED tapes are created equal. Before you buy, clarify a few specs to avoid buyer’s remorse.
Tape Type and Waterproofing: Kitchen countertops mean moisture and splashes. Look for an IP65-rated or higher LED tape, that rating means it’ll shrug off water spray and high humidity. Standard IP20 tape is cheaper but risky near a sink. If your tape will sit directly above a cooktop or steamy pasta pot, consider IP67 (fully submersible rating, though immersion isn’t the plan here).
Length and Coverage: Measure the total linear feet of cabinet undersides you want lit. Most tapes come in 16.4-foot rolls: buy extras rather than falling short. You can cut most LED tapes at designated points (usually every inch), so you’re not locked into rigid lengths.
Power and Connectors: LED tapes come in two main flavors: pre-wired with a plug and transformer included (plug-and-play), or bare-bone strips requiring a separate power supply. Plug-and-play costs more but saves troubleshooting. For hardwired installations, you’ll need a compatible transformer, look for one rated to handle your tape’s wattage (a 16-foot tape typically draws 10–20 watts).
Color Options: Most tapes come in neutral white or warm white: some offer RGB or tunable color-changing versions. Neutral white (around 4000K) looks like office lighting: warm white (2700K) feels cozy. RGB adds complexity and usually requires a wireless remote, which is fun but overkill for task lighting.
Color Temperature and Brightness Considerations
Color temperature is measured in Kelvins (K) and affects the feel of your kitchen. 2700K (warm white) mimics incandescent bulbs, comforting and flattering to skin tones, great for entertaining. 4000K (neutral white) is closer to daylight and ideal for detailed kitchen work like chopping vegetables or reading recipes. 5000K and above (cool white) feels sterile and is less common for residential kitchens.
Brightness, measured in lumens, tells you how much light the tape actually delivers. A typical 16.4-foot warm-white LED tape outputs around 800–1200 lumens total: that’s enough for task lighting but not for primary kitchen illumination. If your cabinets are particularly deep or your countertops dark, aim for the higher end.
Pro tip: buy a short test strip (or ask a retailer for a sample) and install it for a day before committing to the full kitchen. Your eye is the best judge of whether the color and brightness feel right in your actual space.
Installation Steps for a Professional Finish
Preparation is everything. A sloppy install shows, and redoing it means picking off old adhesive tape, no fun.
Step 1: Plan and Mark
Measure each cabinet’s underside. Mark start and end points with a pencil: tape doesn’t bend sharply around corners, so plan for a clean line or slightly angled transition. If cabinets are uneven, a laser level is worth its weight, sight lines matter when the light is on.
Step 2: Clean Thoroughly
Wipe down cabinet undersides with a damp cloth and mild detergent (degreaser works great near the stove). Let dry completely: moisture under the tape reduces adhesion. Rough or powdery surfaces need light sanding (80–120 grit sandpaper) and another wipe. This step takes 15 minutes and prevents the tape from peeling away in six months.
Step 3: Peel and Stick
Remove the backing from one corner of the LED tape. Press the corner firmly onto the cabinet and hold for five seconds. Slowly peel the backing as you press the tape down along the underside, maintaining light tension. Work in 12-inch sections, pressing firmly each time. Don’t stretch the tape, let gravity and adhesive do the work.
Step 4: Route Wiring
If your tape comes with a power cord, route it neatly along the side of the cabinet (behind a corner if possible) to your outlet or junction point. Avoid routing it across the face of cabinets where people will see it. Use small adhesive clips (usually included) to hold the wire snug. Avoid sharp bends: coiled wire behind cabinets can overheat.
Step 5: Test Before Final Seal
Plug in or switch on the tape. Walk around, check for dark spots, and confirm the color looks right. Now’s the time to adjust, not after you’ve sealed everything. If a section feels loose, press it down harder: the adhesive on most tapes activates fully after 24 hours, so tightening now prevents later peeling.
Step 6: Secure Connectors and Hide Gaps
If your tape has visible connectors or gaps between rolls, use white or stainless-steel trim pieces (available from the tape manufacturer or hardware stores) to cover them. This step elevates the finished look from “DIY project” to “installed by a pro.”
Wear safety glasses during cleanup and installation to protect against dust and small debris. No heavy cutting is involved, but keep cordless drill or power tools clear of the damp surfaces until everything is fully dry.
Powering Your LED Tape Safely and Efficiently
This is where many DIYers get confused. LED tapes operate at low voltage (12V or 24V), not standard household current (120V). That’s a safety bonus, no shocking risk, but it means you can’t just plug the tape into a wall outlet. You need a transformer (also called a power supply or driver).
Plug-and-Play Systems: If you bought an all-in-one kit with the tape, transformer, and cord included, just plug it into a standard outlet. The transformer sits in the outlet or a nearby corner, converting 120V to the low voltage your tape needs. These systems come with 6–10 foot cords, so plan outlet location accordingly.
Hardwired Systems: If installing bare LED tape, you’ll buy a separate transformer. Match its voltage (12V or 24V) and wattage capacity to your tape. A rough estimate: a 16.4-foot warm-white tape uses 10–15 watts: a 24V system handles longer runs with less voltage drop over distance. Most residential kitchens use a 12V, 60–100 watt transformer, which can power multiple tape runs.
Where to mount the transformer? Near an outlet or within a cabinet is ideal. Some people hide it inside a pantry or mount it inside a corner cabinet where it’s out of sight but accessible. Ensure the transformer sits in a dry, ventilated spot, don’t seal it in an airtight enclosure or bury it under pile of linens. LEDs run cool, but transformers generate modest heat and need airflow.
Safety Reminder: If your tape requires hard-wiring into your home’s electrical panel or running new circuits, stop and call a licensed electrician. Building codes around electrical work vary by jurisdiction, and improper wiring risks fire. Plug-and-play systems avoid this altogether.
Also confirm your transformer’s cord length before buying. Most come with 6–10 feet of cable. If your nearest outlet is farther away, you can use a short extension cord (heavy-duty, rated for your wattage), but avoid running undersized extension cords over long distances, they overheat and create a fire hazard.
Creative Design Ideas and Layout Inspiration
Once your tape is installed and working, lighting becomes a design element.
Single Run Along the Back Wall: The most common setup. One continuous strip runs from one end of your upper cabinets to the other, pooling light directly onto the countertop. Clean, functional, and less clutter than multiple runs.
Dual-Height Layout: Install one tape under wall cabinets and a second run under a kitchen island or bar seating (if it exists). This creates visual separation and ensures task lighting where people actually sit and work. Requires two transformers or one transformer with enough wattage for both runs.
Inside-Cabinet Ambient Lighting: Instead of (or plus to) under-cabinet tape, install LED strips inside glass-front cabinet doors. It showcases dishware while adding a subtle glow. Use warm white (2700K) for a cohesive feel with your under-cabinet lighting.
Corner Transitions: Where two walls meet, you have options. A simple corner bracket aligns two tape runs at 90 degrees, or you can cut the tape and install slightly offset, creating a subtle shadow line, a designer-level touch.
Color-Changing RGB for Entertaining: If you went the RGB route, use an app or remote to shift warm white during dinner prep, then cool white for entertaining, or even soft color washes during parties. Smart home technology news often highlights new lighting automation, so staying current on what’s possible helps you plan upgrades down the road.
Many kitchen design ideas focus on lighting as part of the overall aesthetic. Your LED tape doesn’t have to stay white, consider your cabinet color, countertop material, and backsplash when choosing brightness and color temperature. A white kitchen with chrome fixtures looks sharp with neutral white (4000K): a warm wood kitchen with stainless steel benefits from warm white (2700K). The investment is small enough to experiment.
Conclusion
Under cabinet LED tape lighting delivers function, style, and simplicity in one afternoon project. Choose the right tape (IP65 rating, appropriate length and brightness), prep and install carefully, power it safely, and design around your kitchen’s existing style. The result is brighter countertops, lower energy use, and a kitchen that feels finished, all without permits, structural work, or calling in a pro. Your sawdust-covered hands will thank you every time you chop an onion under better light.


