
Your kitchen island isn’t just a work surface, it’s the heart of the home, where cooking happens, families gather, and conversations flow. But without proper island lighting, even the most beautiful countertop becomes a shadowy workspace that strains your eyes and makes meal prep a chore. The right island lighting transforms that hub into a functional, welcoming space while adding style and visual interest to your kitchen. Whether you’re installing pendant lights, updating existing fixtures, or starting from scratch, this guide walks you through everything a DIY homeowner needs to know about choosing, installing, and positioning island lighting in 2026.
Table of Contents
ToggleKey Takeaways
- Island lighting serves dual purposes—eliminating shadows for safe food prep while establishing your kitchen’s design aesthetic and anchoring the overall home décor.
- Pendant lights are the most popular choice for island lighting; hang single fixtures 30–36 inches above the countertop for islands under 30 inches wide, and use two or three spaced evenly for wider islands to avoid dark spots.
- Track lighting and minimalist linear fixtures offer flexibility and contemporary appeal, especially for kitchens where the island serves multiple functions from food prep to casual dining.
- Before installing island lighting, verify power requirements, check local building codes, and hire a licensed electrician if new circuits or structural modifications through joists are needed.
- Proper fixture placement and height depend on ceiling clearance (9-foot ceilings offer standard comfort; 8-foot ceilings need shallower fixtures) and keeping fixtures integrated with your kitchen layout rather than creating visual barriers.
- Dimmers with LED-compatible controls add versatility, letting you adjust light for different tasks and moods while maintaining a clean, professional appearance in your kitchen design.
Why Island Lighting Matters in Kitchen Design
Island lighting serves a dual purpose: task lighting and ambient design. Without it, overhead ceiling lights alone create shadowy zones directly over your work surface, the worst place for shadows when you’re prepping food or working with sharp tools. Proper island lighting eliminates these shadows, making chopping, reading recipes, and detailed work safer and more comfortable.
Beyond function, island lighting sets the mood and anchors your kitchen‘s design. Pendant lights hanging above an island naturally draw the eye and can define the kitchen’s style, from industrial to farmhouse to contemporary minimalist. The right fixtures also balance the scale of larger islands, visually breaking up an otherwise massive countertop. Since islands are often open on multiple sides, they’re highly visible from adjoining rooms, making the lighting choice part of your whole-home aesthetic. This is why island lighting deserves as much attention as your cabinet hardware or countertop material.
Popular Island Lighting Styles and Fixtures
Pendant Lights and Chandeliers
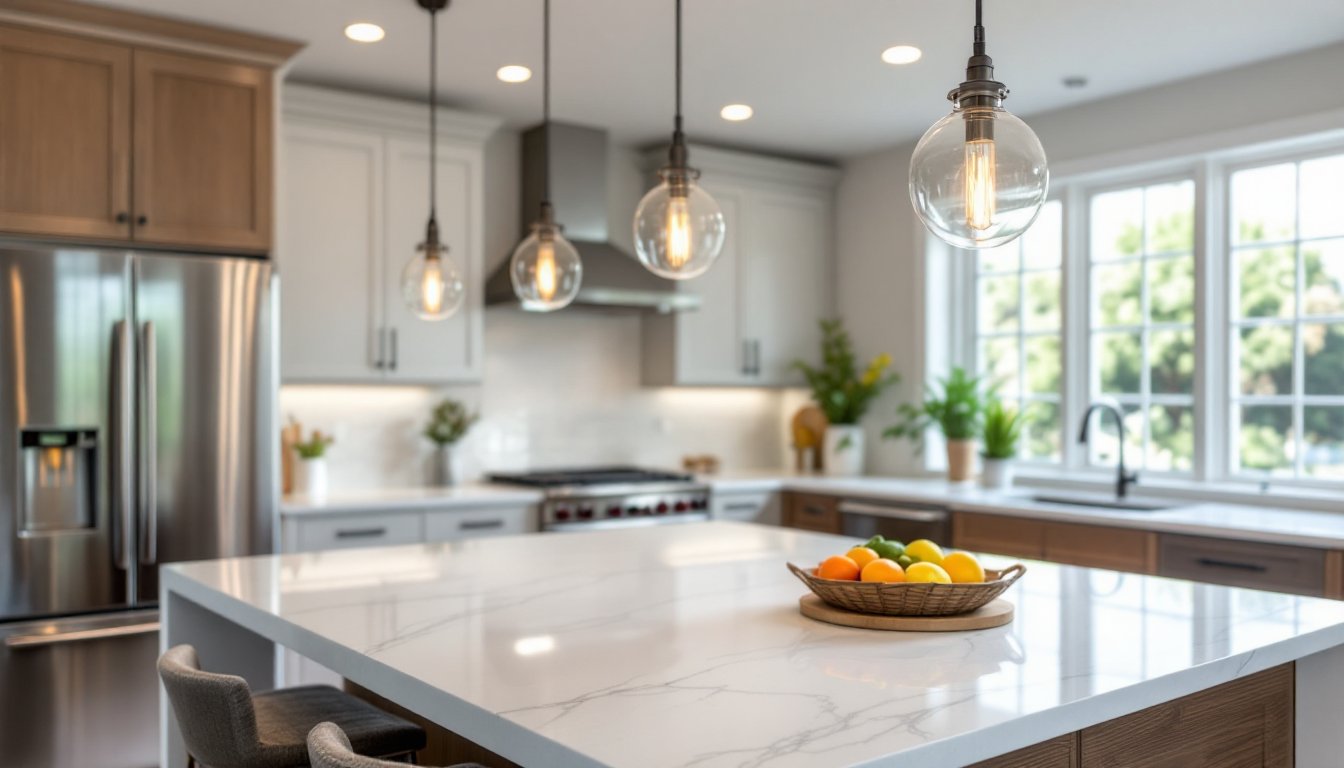
Pendant lights are the most popular choice for island lighting, and for good reason. They hang from a single cord, chain, or stem, directing light downward over the work surface while staying visually light and open. A single large pendant works for narrow islands (24–30 inches wide), while islands wider than 30 inches typically need two or three smaller pendants spaced evenly to avoid dark spots.
When selecting pendants, consider the fixture’s depth and how it relates to your island height and sightlines. A shallow, bowl-shaped pendant hangs lower over the work surface without blocking views across the kitchen, ideal if your island is an open, welcoming hub. Deeper fixtures with more defined sides create intimate pools of light but may obstruct sightlines if hung too low. Glass, metal, and ceramic fixtures all work well: choose materials that complement your cabinet finishes and countertop colors.
Chandeliers offer a more formal or traditional look and work best on very wide islands or in larger kitchens where the fixture won’t dwarf surrounding elements. Modern chandeliers with clean lines integrate well with LED home lighting fixtures, delivering style without the energy penalty of older designs.
Track Lighting and Modern Minimalist Options
Track lighting mounts to a ceiling-mounted rail and allows you to aim and adjust multiple heads, giving maximum flexibility if your island’s position might change or if you want to highlight different zones. This is especially useful in kitchens where an island serves both as a prep zone and a casual dining or assignments spot. Track systems work well over longer islands and pair naturally with contemporary kitchens.
Minimalist options like slim, linear fixtures or recessed spotlights keep visual clutter minimal, appealing to homeowners who prefer understated design. Linear fixtures, essentially a thin bar with integrated LED, hang like a picture frame above the island and distribute light evenly without the visual weight of traditional pendants. These pair beautifully with modern cabinetry and work-focused kitchens where form follows function. Recessed downlights installed in the ceiling directly above the island also work but demand precise placement to avoid shadows: they’re less forgiving than pendant lights if your island position shifts.
How to Choose the Right Height and Placement
Height is where most DIYers stumble. Fixtures hung too high waste light and fail to illuminate the work surface: hung too low, they obstruct sightlines and create an oppressive feeling. The standard rule is to hang pendant fixtures 30–36 inches above the island countertop, measured from the bottom of the fixture to the work surface. If your island has seating on one or more sides (bar stools), you may hang fixtures slightly higher, up to 40 inches, to keep diners from bumping their heads or having their view blocked.
Measure your counter-to-ceiling distance before ordering. A nine-foot ceiling (standard in many homes) gives you comfortable clearance. A lower eight-foot ceiling demands careful planning: you’ll want shallower fixtures or slimmer designs to avoid a cramped feel. Conversely, vaulted or high ceilings (10+ feet) can handle larger, bolder fixtures.
Placement across the length of the island is equally critical. For islands 30–36 inches wide, center a single fixture down the middle. For islands wider than 36 inches, use two fixtures spaced evenly, leaving roughly 12–16 inches from each fixture to the island’s end, and 24–30 inches between the two fixtures themselves. If your island is very long or shaped like an L, three fixtures may be needed. Stand at the seating areas and work zones, imagining the light patterns, you want coverage over prep areas without dark gaps.
Consider how the fixtures align with your kitchen layout. Fixtures should hang far enough from the perimeter to avoid creating a wall-like visual barrier between the island and the rest of the kitchen. This keeps the island feeling integrated, not isolated. If your island has a sink or cooktop, ensure fixtures don’t interfere with ductwork or create shadows over those high-use zones.
Installation Tips for DIY Homeowners
Before you touch a screwdriver, turn off power at the circuit breaker and verify the circuit is dead with a non-contact voltage tester. Island lighting usually requires new wiring run through the ceiling or joists, which may be a permit job in your jurisdiction, check local building code requirements before starting. Running new circuits often demands a licensed electrician, especially if it involves modifications to your home’s electrical service.
If your island sits directly below an existing ceiling outlet, you may get lucky and use that connection after confirming it can safely handle the new fixture’s wattage. Most islands, though, require running new wire. Romex cable (12-gauge or 10-gauge, depending on breaker size) runs through joists from the breaker panel to the fixture location. This is a structural modification: if you’re uncomfortable fishing wire through walls or cutting into joists, hire an electrician.
Once power reaches the fixture location, install a ceiling box rated for the weight of your fixture and the seismic activity in your region. Never hang lights directly to drywall or plaster: use a proper electrical box secured to a joist or cross-brace. Heavy fixtures (chandeliers, multi-head track systems) need bracing rated for at least the fixture’s weight plus a safety factor.
Wiring itself follows standard practice: black to brass, white to silver, ground (bare copper or green) to green or bare. Use wire connectors (wire nuts) to join wires, then insulate with electrical tape on brass and silver connections. Coil excess wire neatly inside the box, don’t crimp or fold it sharply. If your fixture uses a junction box rather than mounting directly to the ceiling box, follow the fixture’s wiring diagram exactly, manufacturers vary on how they handle ground connections and wire entry.
For fixtures with chains or cords, measure the drop length carefully before installation. Most pendant fixtures come with excess chain: trim it to length with chain-link pliers, test the height with a temporary support, then mount permanently. Recessed downlights require cutting precise holes in the ceiling, use a drywall saw or hole saw matched to the fixture diameter. Kitchen lighting options at home centers include pre-wired kits that simplify the job if your island already has nearby power.
Safety essentials: Wear eye protection when drilling overhead: dust falls straight down. Use a stud finder to locate joists and avoid hidden wiring. Never assume a ceiling is empty or safe, scan with a voltage tester before cutting or drilling. If you’re unsure about wiring, disconnecting existing fixtures, or structural support, stop and call a licensed electrician. A $150 consultation beats a $3,000 electrical fire or a code violation that fails inspection and delays your project.
Dimmers are a smart addition, letting you adjust light for different tasks and moods. Install a dimmer switch (compatible with your bulb type, LED dimmers behave differently than incandescent) at the main switch location, then wire the fixture’s hot line through it. Dimmer placement on the island itself (via remote controls or smart bulbs) offers convenience and looks tidier than an extra wall switch.
Conclusion
Island lighting transforms a functional work surface into a designed, inviting kitchen hub. By understanding the interplay between fixture style, height, placement, and wiring, you can create a space that’s both beautiful and practical. When in doubt, especially with electrical work, partner with a licensed pro. A well-lit island pays dividends in usability and home value for years to come.


