
Under-cabinet lighting transforms a kitchen from purely functional to genuinely pleasant to work in. It eliminates shadows on countertops, makes food prep safer, and adds a layer of ambient lighting that overhead fixtures alone can’t deliver. Whether you’re renovating or just want to brighten a dull workspace, under-cabinet lighting is one of the most practical and cost-effective upgrades a homeowner can tackle. The technology has improved dramatically, LEDs are brighter, more affordable, and easier to install than ever. In 2026, you have flexible options that fit nearly any budget, aesthetic, and electrical setup, even if you’re not an electrician.
Table of Contents
ToggleKey Takeaways
- Under-cabinet lighting eliminates shadows on countertops, improves food prep safety, and adds ambient lighting that overhead fixtures alone can’t provide.
- LED strip lights are the most popular and flexible under-cabinet lighting option, offering a slim profile, easy installation, and low power consumption compared to other fixture types.
- Aim for 150–300 lumens per linear foot of counter space for optimal task lighting, with warm white (2700K–3000K) for relaxation and cool white (4000K–5000K) for detailed cooking work.
- Proper surface preparation—cleaning with rubbing alcohol and light sanding—is critical to prevent under-cabinet lighting strips from peeling or sagging over time.
- Most under-cabinet lighting installations don’t require new circuits, as modern fixtures can plug into existing outlets, making retrofits straightforward even in older homes.
Why Under-Cabinet Lighting Matters
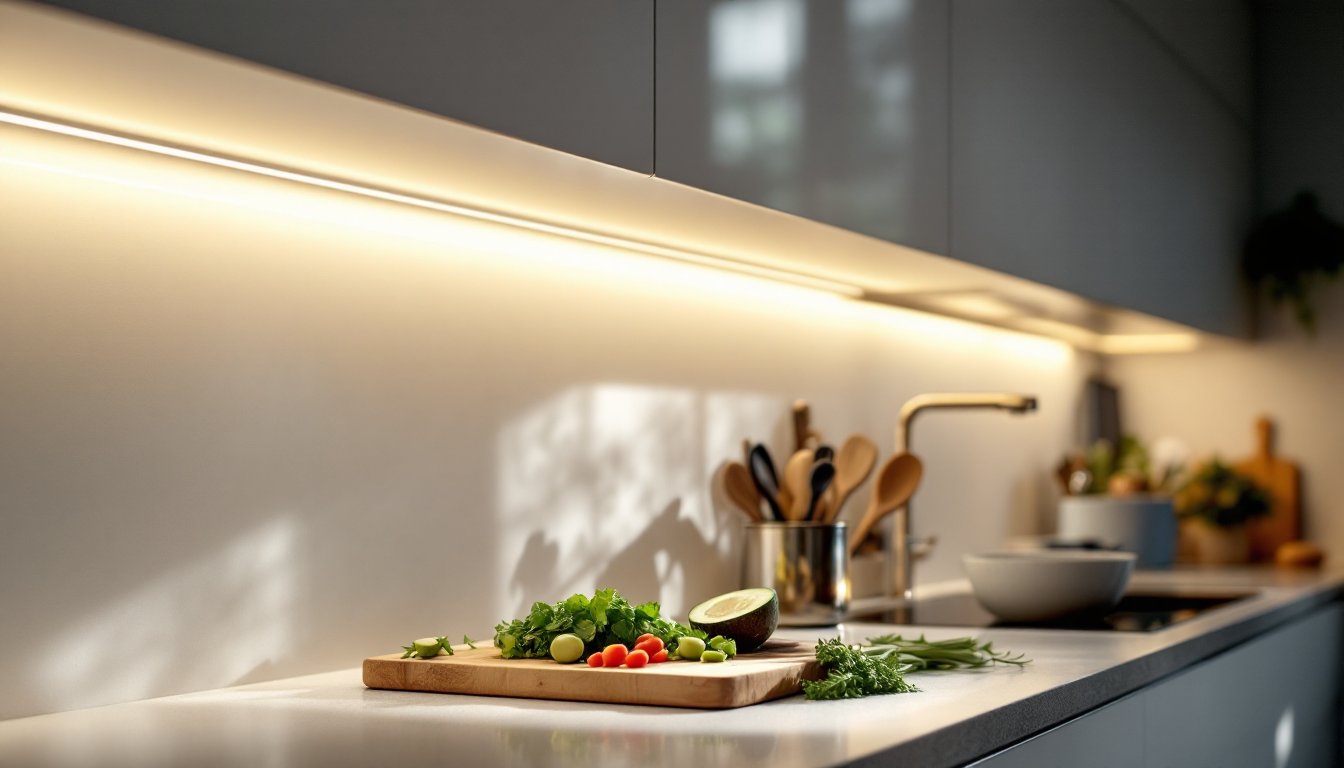
Task lighting under cabinets solves a real problem: your countertop becomes a shadow zone when you’re standing in front of your own work. A knife hits a cutting board you can’t quite see, or you’re squinting at recipes on your phone instead of using the natural light in your kitchen. Under-cabinet fixtures eliminate that glare and shadow, making chopping, mixing, and plating easier and safer.
Beyond functionality, under-cabinet lighting creates mood and visual depth. It draws the eye down into the workspace, makes your kitchen feel larger, and adds a subtle nighttime ambiance that overhead lights don’t provide. Many homeowners find that after installing under-cabinet lighting, they actually use their kitchens more comfortably at night, cooking, snacking, or just hanging out feels less institutional.
Installation doesn’t require running new circuits in most cases. Modern LED home lighting fixtures plug into existing outlets or connect to hardwired switches, making retrofits straightforward even in older homes. The energy cost is negligible compared to the quality-of-life gain.
Types of Under-Cabinet Lighting Options
LED Strip Lights
LED strip lights (also called tape lights or linear LEDs) are the most flexible and popular choice for under-cabinet work. They’re thin, adhesive-backed strips, typically 12 to 24 inches long, that you can install in a continuous run or place strategically under upper cabinets. Because they’re so thin, they tuck behind a cabinet’s trim and stay nearly invisible during the day.
Strip lights come in two main flavors: color-tunable and fixed-color. Fixed-color strips emit either warm white (2700K–3000K, similar to incandescent) or cool white (4000K–5000K, closer to daylight). Warm white is gentler on the eyes in the evening and complements wood cabinetry well. Cool white is sharper for detailed work and pairs better with modern, minimalist designs. Color-tunable strips let you dial in any hue, though they cost more and add complexity.
Advantages: slim profile, easy to hide, dimmable (if you buy dimmable units), low heat output, and low power draw. The trade-off is that cheaper strip lights sometimes have visible diodes or uneven light distribution, spending a bit more ($20–40 per fixture, rather than $10–15) often yields better results.
Puck Lights and Linear Fixtures
Puck lights are small, dome-shaped or disc-shaped fixtures that mount individually, think of them as downlights in miniature. You space them 12 to 18 inches apart depending on brightness and coverage preference. They’re sturdier and look more intentional than strips: some homeowners prefer the aesthetic.
Linear fixtures are rigid bars, usually aluminum, that run the length of a cabinet and house multiple LEDs inside. They’re tidier than strips and typically brighter, though they also cost more. Linear fixtures give a cleaner, more built-in appearance and are less prone to peeling or sagging over time.
Both puck and linear fixtures can be surface-mounted or recessed (cut into the cabinet). Recessed requires more installation work but gives a seamless, high-end look. Surface-mounted is easier and works well if your cabinet profile can hide the fixture bodies.
How to Choose the Right Brightness and Color
Brightness is measured in lumens, a unit of total light output. For task lighting on a countertop, aim for 150–300 lumens per linear foot of counter space. A 3-foot section over a prep area should deliver around 450–900 lumens total. If that sounds vague, here’s a practical rule: if you’re reading a recipe card comfortably without turning on the overhead light, you’ve got enough brightness.
Color temperature affects both mood and usability. Warm white (2700K–3000K) is relaxing and flatters skin tones and wood. Cool white (4000K–5000K) is crisp and ideal for cooking and detail work. Many kitchens use a mix: warm strips over the sink and eating area, cool strips over the prep counter. You can achieve this by installing different fixtures, or by choosing color-tunable kitchen lighting home depot options that let you switch modes.
Color Rendering Index (CRI) matters, too. CRI measures how accurately a light source shows colors, a CRI of 90 or higher is excellent. Lower CRI (below 80) can make produce look dull or meats appear off-color. For kitchen work, aim for CRI 90 or better.
Another consideration: dimmability. Dimmer switches give you flexibility, bright for cooking, softer for evening. Not all LED strips are dimmable, so check the specs. Dimmable strips cost a bit more but pay dividends in comfort and ambiance. If you already have a dimmer on your kitchen lights, verify it’s compatible with your LED choice (some older dimmers flicker with LEDs).
Installation Tips for DIY Success
Measure and plan before buying. Measure the total linear feet of counter space you want to light. Don’t assume cabinets are uniform, they rarely are. Jot down cabinet widths, any gaps between sections, and whether you want continuous coverage or spotty coverage. A diagram (even a sketch on paper) prevents buying too little or too much.
Prep surfaces thoroughly. Adhesive-backed LED strips won’t stick to greasy or dusty cabinet undersides. Wipe the mounting surface with rubbing alcohol and let it dry completely. If cabinets are stained or finished, light sanding (120-grit) helps the adhesive grip. Don’t skip this, poor prep is the number-one reason strips peel or fall within months.
Plan your power source. Most under-cabinet kits plug into an outlet or hardwire to a switch. Outlet-powered lights are easier and don’t require an electrician. If you want hardwired lights tied to a wall switch, you’ll need to run wire and install a junction box, this usually requires a permit and a licensed electrician. Check your local building codes. For most DIYers, a step-by-step under-cabinet lighting installation guide walks through both approaches.
Install carefully, working backward. Start at one end and work toward an outlet or switch. For strips, peel the adhesive backing slowly and press firmly, smoothing out air bubbles as you go. A rubber roller or even a plastic credit card helps. Leave slack (12–18 inches) near connection points in case you need to adjust. For puck lights, pre-drill holes if surface-mounting into wood to prevent splits.
Conceal wires. Wires are the enemy of a clean look. Route power cables inside cabinet frames, behind trim, or along the back wall. Aluminum channels (available with most strip-light kits) hide wires and provide a professional finish. For stylish under-cabinet lighting solutions, good wiring concealment is half the aesthetic.
Test before final positioning. Plug in and verify all lights fire up and brightness is even. Check for shadows or hot spots from different angles. If strips don’t sit flush, adjust before adhesive sets hard. Dimmer switches? Test the dimming range, some LEDs flicker at low levels.
Safety note: If hardwiring, turn off the breaker and test the circuit with a non-contact voltage tester. Wear safety glasses and keep the work area clear. If you’re uncertain about electrical work, call a professional, it’s not worth a shock or fire risk.
Conclusion
Under-cabinet lighting is a smart, achievable upgrade that pays dividends every time you step into your kitchen. Whether you choose affordable LED strips or invest in sleek linear fixtures, focus on brightness (150–300 lumens per linear foot), warm or cool color depending on your preference, and thoughtful installation. Prep your surfaces, plan your wiring, and take your time, a few hours of work now means years of better lighting and safer food prep. Your future self, cooking dinner without squinting, will thank you.


