
Outdoor landscape lighting transforms your yard from a flat, dark expanse into a layered, inviting space, but only if you install it right. Whether you’re lighting a pathway, highlighting a focal point, or extending your entertaining hours, landscape lighting serves both beauty and function. The good news: most outdoor lighting projects don’t require a license or a truckload of gear. With the right fixtures, a solid plan, and an afternoon of work, you can wire up a professional-looking setup yourself. This guide walks you through choosing fixtures, laying out your design, and running the wiring safely.
Table of Contents
ToggleKey Takeaways
- Outdoor landscape lighting installation enhances both safety and curb appeal by lighting pathways, highlighting focal points, and extending your yard’s usable evening hours with a manageable DIY investment of $300–$1,500.
- Low-voltage 12V systems are the ideal choice for DIY outdoor landscape lighting projects because they’re safer, cheaper to operate, and easier to troubleshoot than line-voltage alternatives that require permits and licensed electricians.
- Plan your landscape lighting layout in advance by mapping zones (ambient, task, and accent), spacing fixtures 4–6 feet apart for path lights, and positioning spotlights at 30–45 degree angles to maximize visual impact and prevent wasted fixtures.
- LED bulbs are superior for landscape lighting, lasting 25,000–50,000 hours while using 75% less energy than incandescent bulbs, with warm color temperatures (2700K–3000K) creating inviting ambiance and cool tones (5000K+) enhancing security.
- Always use waterproof connectors and direct-burial rated wire (10–12 AWG gauge for optimal performance), bury cable 2–3 inches deep for protection, and test all circuits before finalizing your installation to catch cold joints or moisture issues early.
- Maintain your landscape lighting system annually by inspecting connectors for corrosion, trimming overgrown branches, cleaning fixture lenses, and replacing weatherproof sealant every 2–3 years to ensure long-term durability and consistent performance.
Why Outdoor Landscape Lighting Matters For Your Home
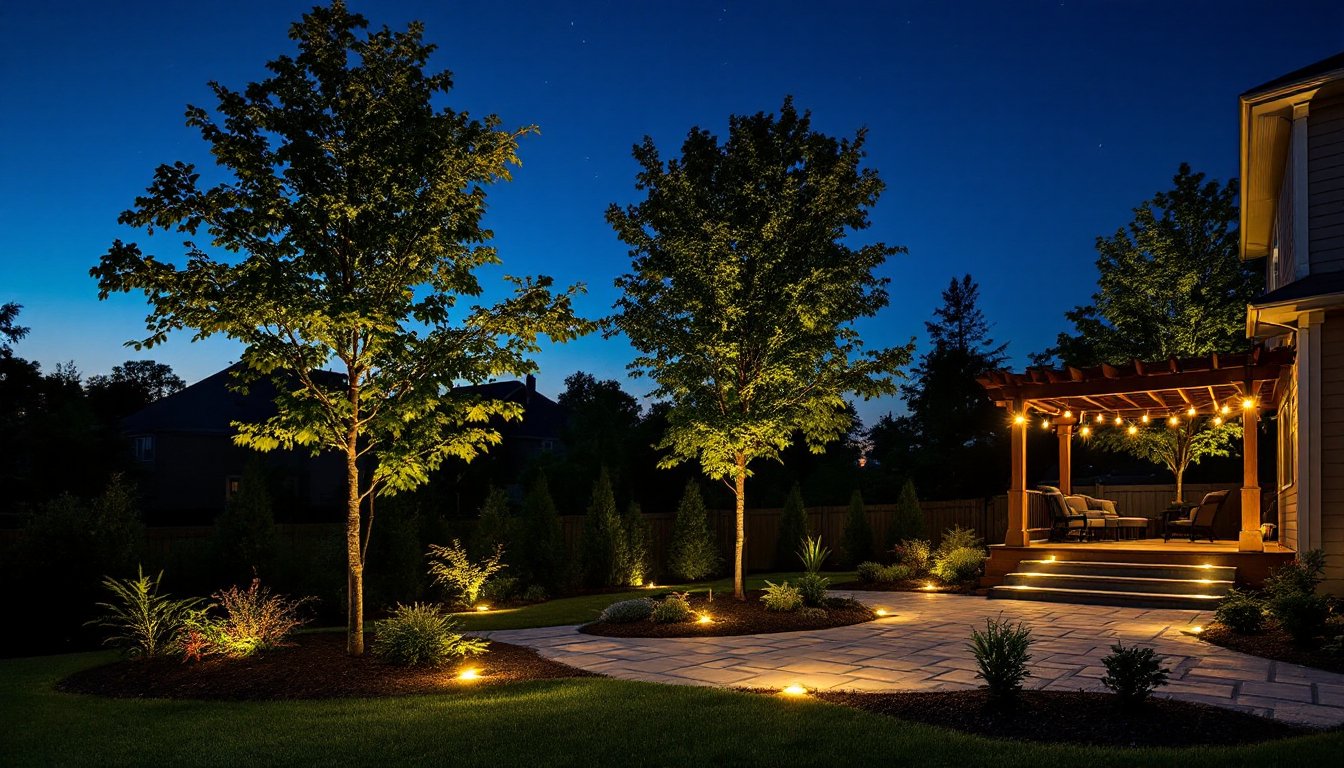
Landscape lighting does more than make your property look good at dusk, it adds safety, security, and usable living space. A well-lit path prevents stumbles and broken ankles. Accent lighting on trees, retaining walls, or water features creates visual depth and draws the eye to what you want noticed. Security lighting near entry points and along the perimeter deters trespassers and makes the insurance company happier too.
Beyond the practical side, outdoor lighting extends your yard’s use into evening hours. An illuminated deck or patio becomes a gathering spot, not a dark no-go zone at sunset. Since most landscape setups run on low-voltage systems (12 volts, not the 120 volts that powers your house), the risk of shock or fire is low, and they’re easier on the utility bill than line-voltage fixtures. The investment, typically between $300 and $1,500 for a DIY residential system, depending on fixture count and wire run, pays back in both functionality and curb appeal.
Choosing The Right Lighting Fixtures And Bulbs
Fixtures and bulbs matter because they set the mood, define the lifespan of your system, and determine how much you’ll spend on replacements and electricity. Modern outdoor landscape lighting comes in two main voltage categories: low-voltage (12V) and line-voltage (120V). Low-voltage is the DIY-friendly default, safer, cheaper to run, and easier to troubleshoot. Line-voltage requires a permit in most jurisdictions and a licensed electrician, so we’re focusing on low-voltage here.
Bulb choice is just as important. LED bulbs dominate now, and rightfully so. They last 25,000–50,000 hours (versus 1,000–2,000 for incandescent), use 75% less energy, and run cooler. A warm color temperature (2700K–3000K) looks inviting: cool white (5000K+) feels sterile but works for security lighting. Check the lumen output, pathway lights typically need 50–100 lumens, while accent spotlights need 100–300. Dimmer-compatible LEDs give you flexibility to adjust ambiance.
Types Of Landscape Lights To Consider
Path lights are short stakes (12–18 inches) with a cap and lens, usually placed 4–6 feet apart along walkways. They’re inexpensive ($15–$30 each) and simple to install, just push the stake into soil.
Spotlights and floodlights throw light at distance, perfect for uplighting trees, walls, or architectural features. Spotlights are narrow-beam (15–25 degrees), floods are wide (40–60 degrees). Budget $30–$75 per fixture.
Well lights sit flush in the ground or deck surface, so they don’t catch your toe. Great for dramatic uplight effects, but they hide until dark, so they won’t clutter daytime views. Expect $40–$80 each.
String lights and rope lights add festive ambiance to pergolas, fences, or overhead. They’re fun but less directional: think decorative, not functional.
In-ground border lights (also called hardscape or deck lights) mount on retaining walls, deck stairs, or landscape walls to mark edges. They cost $20–$60 and prevent missteps.
Planning Your Outdoor Lighting Layout
A haphazard lighting layout wastes fixtures, creates dark patches, and looks amateurish. Spend 15–20 minutes sketching a plan before you buy anything. Walk your yard at dusk with a notebook and flashlight. Where do you want to guide feet? Where’s the feature you want to highlight? Where does light already exist from neighbors’ houses or street lamps?
Start with layers. Ambient light (like wide floodlights on the house wall or overhead string lights) sets the overall mood. Task lighting (path lights, deck lights, stair wells) helps people move safely. Accent lighting (uplit trees, spotlit water features, wall washers) adds visual interest and draws the eye where you want it.
Measure the distances from your transformer (the box that steps voltage down from 120V to 12V) to each light location. Most low-voltage systems cap wire runs at 150–200 feet before voltage drop becomes noticeable: check your transformer specs. If your yard is larger, use multiple transformers or run thicker gauge wire. Sketch zones: main zones like the patio or driveway, secondary zones like tree accent areas, perimeter zones for security.
When placing path lights, space them consistently, often 4, 6, or 8 feet apart depending on lumen output and how bright you want the path. Spotlights on trees work best at a 30–45 degree angle from the base: too steep and you silhouette the foliage, too flat and you wash out detail. Mark locations with landscape chalk or spray paint, you can always move them, but it’s easier before you dig.
Use project planning tools or apps (many lighting suppliers offer free design software) to visualize before you start. This step prevents buyer’s remorse and saves hours of repositioning later.
Step-By-Step Installation Process
Once you have your layout and fixtures in hand, installation is straightforward. You’ll need basic tools: a spade, a small shovel, wire strippers, a screwdriver set, wire connectors, and a multimeter if you want to troubleshoot later.
Step 1: Install the transformer. Place it in a dry, accessible spot (usually under an eave, in a garage corner, or a weatherproof enclosure). Mount it with screws: don’t just lean it against a wall. Connect it to a GFCI-protected outdoor outlet (if using plug-in) or have a licensed electrician hardwire it. This isn’t DIY if hardwired, codes vary and require permits.
Step 2: Run the wire. Unroll low-voltage landscape wire along your planned route. It doesn’t have to be buried yet, lay it out, weave it around existing plants, and adjust. This is your chance to second-guess the path before digging. Most wire is rated for direct burial, but burying it 2–3 inches deep protects it from foot traffic, mowers, and sun damage. A flat spade or narrow trenching shovel makes a shallow slit: you don’t need a trench wide enough to swim in.
Step 3: Connect fixtures to the wire. Use pre-made wire connectors (usually twist-on or push-in) that are sized for low-voltage wire. Strip about ½ inch of insulation from the main wire and fixture leads, then insert both into the connector. Twist or push until snug. Some kits use solder and heat-shrink tubing, overkill for outdoor 12V, but it works. All connectors should be waterproof: consider weatherproof junction boxes if a fixture is far from the main run.
Step 4: Place fixtures and stake them. Path lights and well lights are straightforward, push the stake where you marked it. Spotlights need a small spike base or bracket: level the angle before you tighten the bolt. Check aim in daylight: when evening comes, verify the light hits your target.
Step 5: Test the circuit. Before burying wire, plug in or switch on the transformer. All fixtures should light. If one doesn’t, check the connector, most failures are cold joints or moisture trapped in the connector. A quick multimeter test across the fixture leads (with power off) tells you if it’s getting voltage.
Step 6: Bury wire (optional). If you want a clean look and protection, slice the sod or soil along your layout line with a flat spade, lift the turf, tuck the wire underneath, and press it back down. Grass grows over it within weeks. If burying isn’t practical (rocky soil, existing landscape), run wire along edges or through landscape beds. Dark wire is less visible than light gray.
Wiring And Electrical Safety Essentials
Low-voltage landscape wire is safe, but it’s not invulnerable. Always use cable rated for direct burial (check the jacket marking: UF, USE, or similar). This wire has thicker insulation that resists moisture and UV.
Wire gauge matters. Standard landscape kits use 12 AWG or 14 AWG wire. For runs longer than 100 feet, use 10 AWG to avoid voltage drop that dims your lights. Each step down in gauge (higher number = thinner wire) increases resistance: resistance = power loss.
Connectors are critical. Twist-on connectors are fast, but push-in connectors (also called “easy-connects”) are more forgiving and less prone to cold joints. Waterproof connectors with silicone-filled wells prevent corrosion. Never use wire nuts meant for 120V, they don’t seal properly on low-voltage wire.
If your system is line-voltage (120V), you must hire a licensed electrician or pull a permit. The risk of electrocution, fire, and code violations isn’t worth the savings. Check your local building department and insurance requirements before going high-voltage.
Wear work gloves when digging (splinters, sharp rocks) and safety glasses when stripping wire. Low-voltage shock is unlikely to kill you, but a wire nick or cut is painful. If you’re working near existing utilities, call 811 (in the US) to have lines marked before digging.
Keeep fixtures away from pools, wet areas, and puddles. Yes, 12V is low-risk, but water is still water. Use GFCI protection on any plug-in transformers, and never submerge wiring.
Maintenance And Long-Term Care Tips
Once your landscape lighting is running, maintenance is minimal if you’ve used quality fixtures and materials. LED bulbs rarely fail, so you’re not replacing them every season like you might with incandescent.
Annual checks: In spring, inspect connectors for corrosion or moisture. If a connector looks suspect, cut it out and splice in a fresh one. Bury any exposed wire that heaved up during winter freeze-thaw cycles. Trim tree branches that overgrow spotlights, blocked light defeats the purpose. Remove dirt and spider webs from fixture lenses with a soft brush: clean glass transmits light better.
Transformer care: Keep the transformer dry and free of debris. If it’s plug-in, make sure the outlet and cord are undamaged. Check for loose bolts or mounting hardware: vibration can shake things loose over years. Most transformers last 10–15 years before capacitors fail: at that point, replacement is cheaper than repair.
Weatherproofing: Reapply weatherproof sealant to any above-ground connections every 2–3 years if you live in a wet climate. Silicone caulk protects solder joints and exposed terminals.
Seasonal adjustments: In fall, aim spotlights a bit higher to compensate for lower sun angle and clearer air. Summer’s haze can make the same angle feel dim by winter. Adjust path light spacing if you add new garden beds that block sightlines.
If a fixture stops working, it’s usually a connector issue. Multimeter testing confirms whether power is reaching the fixture. Most problems are simple enough to troubleshoot and fix without replacing the whole circuit. For complex wiring issues or if you’re considering an upgrade, homeowner resources on project planning offer cost estimators and contractor matching if you’d rather hire out.
Proper maintenance keeps your system running smoothly and looking sharp for years. It’s a small investment of time for big returns on ambiance and safety.


