A well-lit bathroom mirror isn’t a luxury, it’s the foundation of a functional space. Whether you’re shaving, applying makeup, or just checking your reflection, poor lighting creates shadows and frustration. A bathroom mirror with lighting solves this instantly, transforming a dark corner into a practical focal point. This guide walks you through choosing, installing, and maintaining the right setup for your home, no contractor required. We’ll cover everything from LED efficiency to installation methods, so you can tackle this project with confidence.
Table of Contents
ToggleKey Takeaways
- A bathroom mirror with lighting eliminates shadows and provides even illumination for grooming tasks, improving both aesthetics and safety in your bathroom.
- LED bathroom mirror lighting uses 75% less energy than incandescent fixtures and lasts 25,000 to 50,000 hours, saving approximately $140 over a 10-year lifespan.
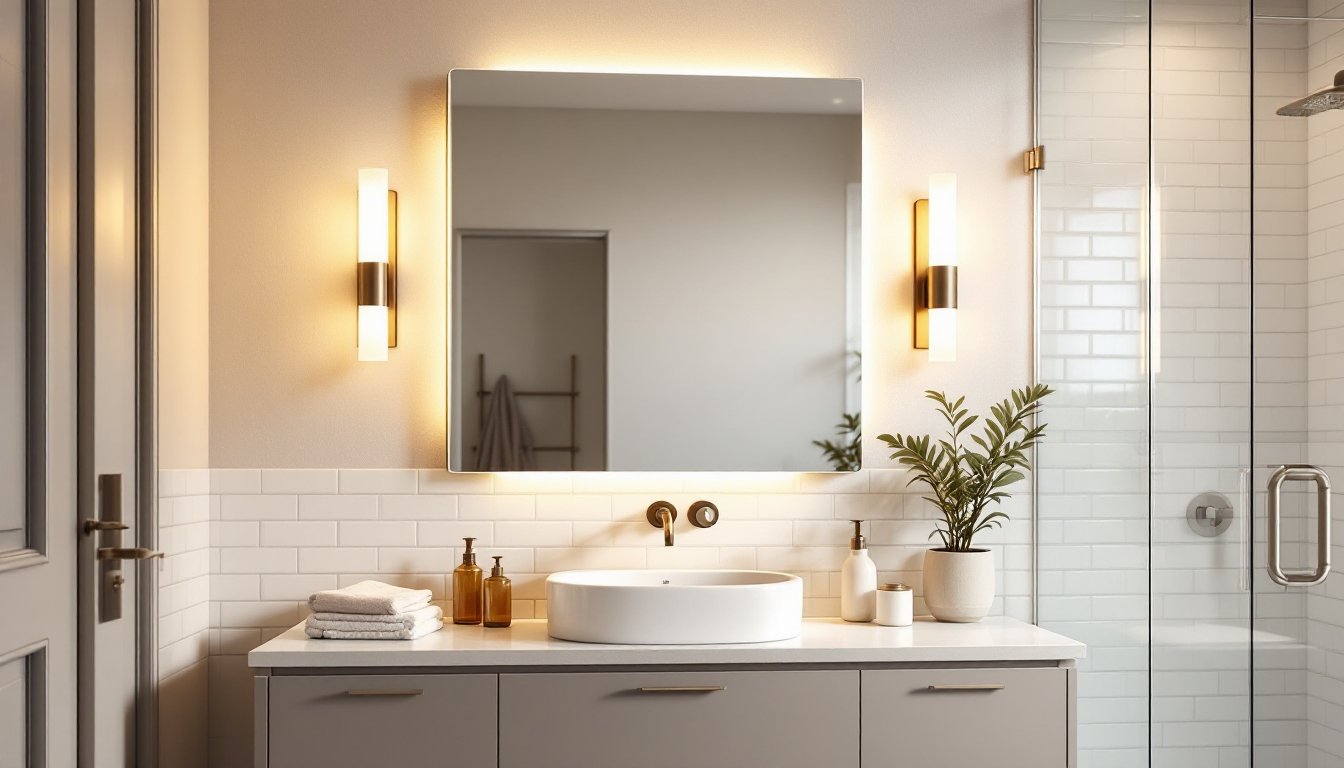
- Choose between side-mounted sconces, overhead strips, or integrated LED mirrors; most bathrooms need 1,500 to 2,000 total lumens, with fixtures mounted at eye level for flattering results.
- DIY installation requires turning off power at the breaker, marking holes with a level, connecting wires (black to black, white to white, ground to ground), and testing before use.
- Warm white (2700K) LEDs flatter skin tones for evening routines, while cool white (5000K) mimics daylight and suits morning grooming and makeup application.
- Maintain your bathroom mirror lighting by wiping fixtures quarterly with a soft cloth, checking for corrosion, and ensuring proper ventilation to prevent humidity damage.
Why Lighting in Bathroom Mirrors Matters
Bathroom lighting serves a dual purpose: it’s functional and aesthetic. Poor mirror lighting creates harsh shadows under the eyes and chin, making grooming tasks harder and less pleasant. Task lighting placed directly above or beside a mirror eliminates these shadows, providing even illumination across your face and neck.
Beyond grooming, proper bathroom mirror lighting improves safety. A well-lit vanity helps prevent slips and falls when moving around the space. It also allows you to notice skin concerns, check medication labels, and apply products with precision. Inadequate lighting leads to mistakes, think botched shaving or mismatched makeup application.
Energy efficiency matters too. Modern bathroom mirrors with LED lighting use 75% less energy than incandescent fixtures and last 25,000 to 50,000 hours. That’s years of daily use before replacement. LED options also run cooler, reducing heat buildup in an already humid environment.
Choosing the Right Type of Bathroom Mirror Lighting
LED vs. Incandescent vs. Fluorescent Options
LED lights dominate the bathroom mirror market in 2026, and for good reason. They’re energy-efficient, produce minimal heat, and come in adjustable color temperatures, from warm white (2700K) to cool white (5000K). Warm white flatters skin tones: cool white mimics daylight and suits detailed work. Many homeowners choose 5000K LEDs for accurate color rendering, especially if applying makeup or skincare.
Incandescent bulbs are becoming obsolete, but some people still prefer their warm glow. They’re cheap upfront but consume three times more energy than LEDs and burn out every 1,000 hours. They also generate heat, which isn’t ideal in bathrooms where moisture is already an issue.
Fluorescent lights offer decent efficiency but flicker slightly and take time to warm up. They’ve largely been replaced by LEDs. If you inherit a fluorescent fixture, retrofitting it with LED bulbs is straightforward and saves money long-term.
Color temperature and brightness matter. Most bathrooms benefit from 60 to 80 lumens per square foot. A 48-inch vanity mirror typically needs 1,500 to 2,000 total lumens. Test samples at a hardware store before committing: what looks good in showroom lighting might feel off in your actual bathroom.
Installation Methods and Mounting Styles
Bathroom mirrors with integrated lighting come in three main configurations: vertical side-mounted sconces, horizontal overhead strips, and integrated mirrors with built-in LED strips.
Vertical sconces flank the mirror on either side, providing balanced light that minimizes shadows. This is the most flattering layout for grooming. Mount them at eye level, typically 60 to 66 inches from the floor, and space them 12 to 24 inches from the mirror’s edge.
Overhead strips (sometimes called vanity bars) mount directly above the mirror. They work well for narrow bathrooms where wall space is tight. But, they can cast shadows downward if positioned too high. Install them 12 to 18 inches above the mirror’s top edge for best results.
Integrated LED mirrors have lighting built into the frame or backlit behind the glass. These eliminate separate fixture installation but offer less flexibility for adjusting brightness or color temperature. They’re ideal for modern, minimalist designs but cost more upfront.
Mounting considerations include stud placement, wall material, and electrical access. Most fixtures require a 2-wire cable running from the breaker to a switch location. If no outlet or switch exists near your mirror, you’ll need to run new electrical, this may require a permit and a licensed electrician depending on your jurisdiction. Check local building codes before starting.
DIY Installation Tips for Homeowners
Before starting, gather your materials: the new fixture, a power drill with bits, a voltage tester, wire nuts, a level, measuring tape, and wall anchors (if not mounting into studs). Wear safety goggles and work gloves.
Step 1: Turn off power at the breaker and verify it’s off using a non-contact voltage tester. This is non-negotiable, electrical work can be dangerous.
Step 2: Remove the old fixture by unscrewing mounting brackets and disconnecting wires. Cap any exposed wires with wire nuts and tape them back into the wall.
Step 3: Mark mounting holes using the new fixture’s template. Use a level to ensure the fixture sits straight. This prevents water from pooling on horizontal surfaces.
Step 4: Drill pilot holes and install heavy-duty wall anchors if studs aren’t available. Most bathroom mirrors locate studs, but anchors provide security for drywall-only mounts. Studs are typically 16 inches apart, measure from a corner to find them.
Step 5: Connect wires using wire nuts, matching black to black (hot), white to white (neutral), and bare copper to bare copper (ground). Tuck wires into the electrical box and secure the fixture.
Step 6: Install bulbs or LEDs, restore power, and test. Flip the switch, if nothing happens, check connections or call an electrician. Many modern fixtures include dimmer compatibility, which is worth verifying if you already have a dimmer installed. Retrofit fixtures typically work with existing dimmers, but integrated mirrors may not. Read the manual carefully.
Design Ideas to Match Your Bathroom Aesthetic
Your mirror lighting should complement your bathroom’s style. Farmhouse bathrooms pair well with black metal sconces with Edison-style bulbs. Industrial spaces suit chrome or brushed steel fixtures with minimalist lines. Contemporary designs often feature sleek, integrated LED mirrors with no visible mounting hardware.
For spa-like atmospheres, look for fixtures that offer color temperature adjustment. Dimmer switches paired with warm white LEDs create a relaxing mood, perfect for evening routines. Bright cool white suits morning grooming and makeup application. Some smart mirrors now include app controls for on-the-fly adjustments.
Wall color and finish affect how lighting looks. Glossy white walls reflect light and amplify brightness: matte finishes absorb some light. A secondary consideration is mirror shape and size, larger mirrors require proportionally larger lighting fixtures to avoid looking unbalanced. A small, narrow mirror with oversized side sconces looks awkward: an expansive vanity demands stronger fixtures.
For design inspiration and ideas, platforms like Houzz showcase thousands of bathroom setups across styles and budgets. Home design galleries also provide visual references for color combinations and fixture placement. When planning upgrades, seeing real installations beats guessing based on product photos alone.
Maintenance and Energy Efficiency Considerations
LED lights last 25,000 to 50,000 hours, roughly 13 to 27 years of daily use, but fixtures themselves may need maintenance sooner. Hard water deposits and humidity corrode mounting hardware over time. Every three months, wipe down fixtures with a soft cloth and mild soap. Check mounting brackets for corrosion or loosening: tighten bolts as needed.
For recessed or strip lighting, dust accumulates inside trim rings. Use a soft brush or microfiber cloth to gently clean lenses quarterly. Don’t use harsh chemicals: they can damage coatings.
Energy efficiency isn’t just environmental, it saves money. A 60-watt incandescent vanity fixture costs roughly $15 per year to operate (at U.S. average rates). The same output from a 9-watt LED costs about $1 annually. Over a fixture’s 10-year lifespan, that’s a $140 difference. LEDs also produce less heat, reducing strain on bathroom ventilation systems.
One important note: if your bathroom lacks an exhaust fan, excessive humidity can damage fixtures and create mold. Installing or upgrading your ceiling lighting and ventilation improves air quality and fixture longevity. Similarly, if you’re planning comprehensive bathroom upgrades, coordinating mirror lighting with overall kitchen and bath fixtures ensures consistent style and functional lighting zones.
When replacing LEDs, source replacements from the original manufacturer when possible. Mismatched bulbs can create color temperature inconsistencies. Modern LED fixtures are often non-replaceable (the bulbs are integrated into the fixture itself), so buying quality upfront matters. Weigh initial cost against replacement cycles and energy savings, a $150 LED fixture that lasts 20 years beats a $40 incandescent replaced every two years.
For detailed guidance on installation techniques and flattering bathroom lighting layouts, professional remodeling resources offer step-by-step instruction beyond basic mounting.