
Good outdoor lighting transforms your backyard from an unusable space after sunset into a destination. Whether you’re hosting a summer dinner party or just enjoying a quiet evening, the right backyard outdoor lighting ideas make all the difference. Beyond aesthetics, proper lighting extends your outdoor living season, improves security, and adds value to your home. This guide walks you through seven proven approaches, from classic string lights to smart color-changing systems, so you can pick what works for your space, budget, and lifestyle. We’ll skip the fluff and focus on practical installations you can handle yourself or hand off confidently to a professional.
Table of Contents
ToggleKey Takeaways
- Backyard outdoor lighting ideas range from affordable string lights and solar stake lights to smart color-changing systems, each solving different ambiance, safety, and functional needs.
- String lights require proper mounting with 6–8 inches of sag per 10 feet of span and stainless steel hardware to prevent corrosion in outdoor environments.
- Solar pathway lights are ideal for accent lighting but underperform in shaded areas or cloudy climates—look for mid-range units ($15–35) with lithium batteries and at least 0.5 watts LED output.
- Low-voltage landscape lighting (12V) offers safer, more reliable installation than line-voltage work and typically doesn’t require building permits.
- Smart outdoor lighting lets you adjust brightness, set schedules, and integrate motion sensors, saving energy by dimming fixtures after dark or triggering lights on demand.
- Always use GFCI-protected outlets, bury cables at least 6 inches deep, and check local codes before permanent 120V installations to ensure safety and compliance.
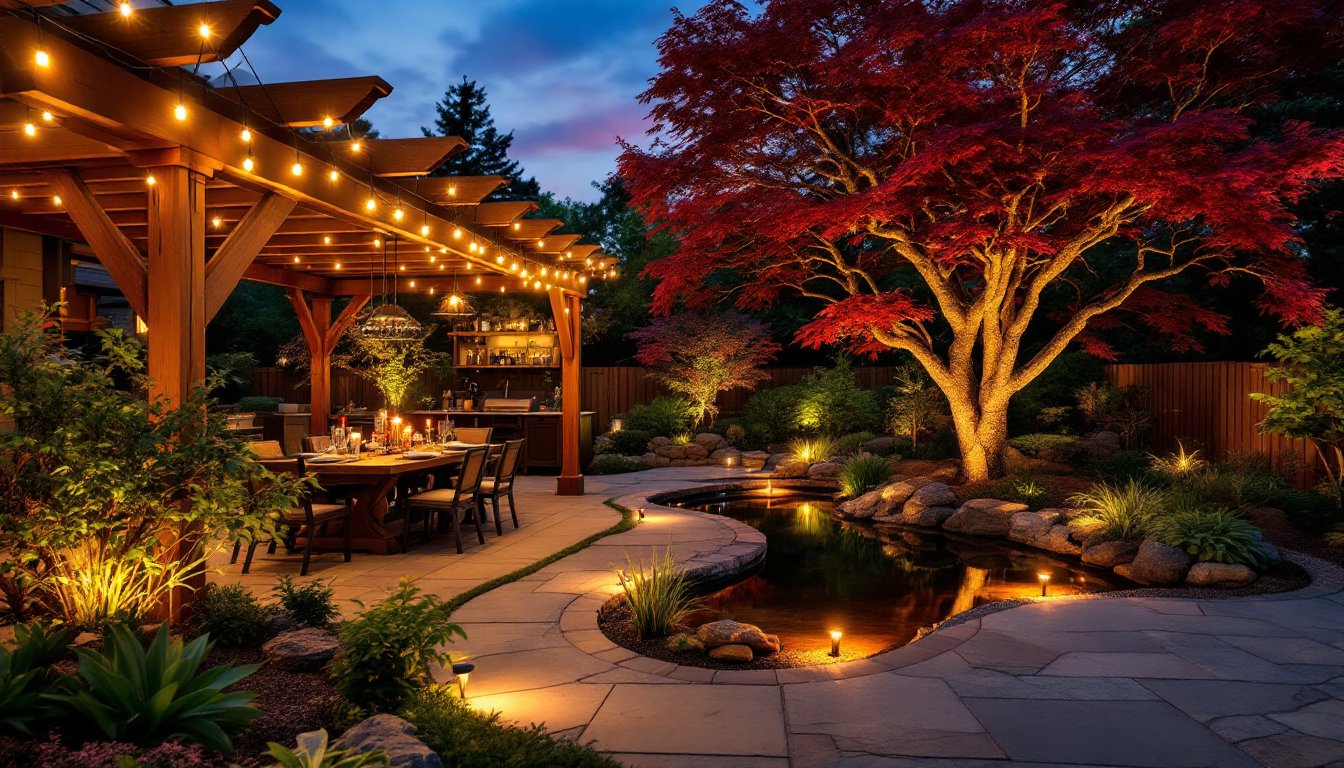
String Lights and Overhead Lighting
String lights are the workhorse of outdoor illumination. They’re affordable, flexible, and create instant ambiance without requiring permanent wiring. Edison-style incandescent strings run warm and nostalgic: LED versions last five to seven times longer and cost less to operate. Plan on roughly 4–6 watts per bulb for visibility and atmosphere.
Mounting matters. Drape strings across a pergola, between fence posts, or from the house to a detached structure, aim for a gentle sag, about 6–8 inches per 10 feet of span, so tension doesn’t strain fixtures. Use stainless steel eye bolts or lag hooks rated for outdoor use: galvanized hardware corrodes faster in humid climates. For post-to-post runs, make sure posts are set at least 3 feet into the ground on a concrete footer (check local frost lines).
If you’re adding overhead fixed lighting, consider soffit-mounted fixtures mounted beneath eaves (typical spacing: 8–10 feet apart) or pendant lights hung from a pergola frame. These usually need 120V power run through outdoor-rated conduit. You’ll likely need a permit and a licensed electrician unless you’re tapping into an existing outlet with GFCI protection (ground fault circuit interrupter, non-negotiable for wet environments).
Older string light installations often don’t account for moisture seep into connectors. Always use weatherproof end-cap covers on splitters and a timer switch to avoid leaving lights on accidentally.
Path and Accent Lighting for Safety and Style
Low-level path lighting does double duty: it guides movement and highlights landscape features. Solar stake lights are the simplest entry point, no wiring, just push into soil, and they charge by day. Look for units with at least 0.5 watts LED output: cheaper models fade quickly and don’t illuminate far enough to be useful. Spacing typically runs 4–6 feet apart on walkways.
If you want consistent brightness regardless of cloud cover, hardwired low-voltage path lights (12V) are more reliable. They run on a transformer stepped down from standard 120V household power, so installation is safer than line-voltage work. Most landscape lighting kits come with everything, just bury the cable 6 inches deep along the path edge, away from foot traffic. Mark the line with spray paint first so you don’t dig it up later.
Accent lighting directs light onto trees, shrubs, or architectural features. Uplighting (light source at ground level pointing up) makes a specimen tree dramatic: downlighting (mounted high, aiming down) looks natural and reduces glare. Spacing and angle depend on your specific feature, so grab a battery-powered work light and test the effect during dusk before committing to permanent fixtures.
When planning path systems, check local codes, some jurisdictions require minimum footcandle levels (brightness measured in lumens) on walkways for liability reasons. A landscape electrician familiar with your area can advise quickly.
Solar-Powered Lighting Solutions
Solar lights appeal because they’re cordless and free to operate. A decent solar pathway light has a lithium or NiMH rechargeable battery, a photocell that triggers dusk-to-dawn operation, and enough lumens to cast a visible glow 10–15 feet. Budget mid-range units ($15–35 each) over ultra-cheap options: the battery chemistry and LED quality justify the cost.
The catch: solar lights underperform in shade and during cloudy stretches. If your backyard gets fewer than four hours of unobstructed sun daily, solar is less practical. During winter in northern climates, you’ll notice dimmer output because charging cycles are shorter. They’re perfect for accent lighting around seating areas or garden perimeters, less ideal for task lighting near the grill.
Maintenance is minimal. Clean panels once or twice yearly with a damp cloth: replace batteries every 2–3 years (some units make this easy, others require opening the fixture). Avoid cheap plastic fixtures, UV exposure cracks them within a season. Look for ABS or polycarbonate housings rated for your climate zone.
One pro move: pair solar pathway lights with a small solar string light setup (separate solar panel charges a battery pack that powers decorative strings). This hybrid approach gives you ambiance plus ambient light without running dedicated circuits.
Smart and Color-Changing Options
Smart lighting adds flexibility and control at the cost of complexity. Connected outdoor lights let you adjust brightness, color temperature, and on/off schedules from your phone, handy for simulating occupancy when you’re away. RGB (red-green-blue) color-changing bulbs transform your space for holidays or parties, though the novelty wears off quickly for most DIYers.
Popular platforms include systems using WiFi or Bluetooth connectivity (often branded for Alexa or Google Home compatibility). Installation is the same as wired or solar equivalents: the smarts live in the bulb and a hub or app. Expect to pay $25–60 per bulb, plus any hub or bridge ($30–80). Battery-powered smart bulbs exist but usually cost more and need frequent charging.
The real benefit isn’t flash, it’s consistency and energy savings. Set a schedule so path lights dim at midnight instead of burning all night. Layer dimmable overhead fixtures so you can adjust ambiance without getting up. Some outdoor smart systems integrate with motion sensors, so lights trigger when you step onto the patio.
Pitfalls: make sure your WiFi network reaches the backyard (a mesh system helps), and confirm the bulbs work in outdoor-rated fixtures rated for the operating temperature range. Some affordable color-changing strings skip weather-resistant connectors: water inside splitters kills the whole run. Read reviews carefully and check warranty coverage.
Water Feature and Landscape Lighting
Adding light to water, a fountain, pond, or pool, brings magic to an otherwise dark corner. Submersible LED lights are safe and durable (always buy models rated IP68, meaning fully submersible). They run on low voltage (12V) and can be tethered to hardwired transformers or powered by solar battery packs.
For a fountain, position lights to graze the falling water so it catches the glow. For a pond, submerged lights aimed upward create a glowing effect from within. RGB submersible lights add color but can look garish unless tuned right, white or warm amber usually looks more refined than constantly cycling rainbows.
Checking local codes matters here. Some jurisdictions require bonding and grounding of any electrical equipment near water: others have rules about light pollution affecting neighbors. Chat with your local building department before digging a new pond or adding complex wiring.
Upgrading existing landscape beds with light means rethinking plant placement. Dark foliage (like burgundy Japanese maple or black mondo grass) shows light beautifully and photographs well. Variegated or chartreuse plants reflect light naturally, so go easy on fixture intensity to avoid a washed-out look.
Landscape lighting isn’t just decorative, it’s part of how people read your property’s scale and design at night. Lighting the perimeter trees makes your lot feel larger: uplighting a specimen focal point draws the eye. Think layers: ambient (overhead or string), task (grill or dining area), and accent (trees, water, statuary).
DIY Installation Tips and Best Practices
Permit and power: Before running any 120V outdoor circuits, check whether permits are required in your area. Most jurisdictions require them for permanent installations. If you’re unsure, call your local building department, $30 and an hour beats a code violation. For low-voltage landscape lighting (12V or solar), permits are usually waived.
Outlet placement: Existing outdoor outlets (GFCI-protected) are your safest route for powering timers, transformers, or holiday lights. If none exist and you’re adding one, hire a licensed electrician. Running extension cords permanently under mulch or across walkways is a fire hazard and voids most homeowner insurance claims if something goes wrong.
Cable and conduit: Bury low-voltage outdoor cable at least 6 inches deep. Use a cable locator (spray-painted flags work in a pinch) so you don’t dig it up later. For 120V work, always run wire through rigid conduit rated for outdoor use. Burying bare wire is asking for a shock or fire.
Fixture mounting: Use stainless steel or galvanized hardware only. Mild steel rusts and stains surrounding surfaces. Thermal paste under bulb connections prevents corrosion and improves contact. When mounting anything to wood, predrill holes and use corrosion-resistant screws (stainless or ceramic-coated): wood swelling/shrinking stresses connections over time.
Seasonal maintenance: In fall, drain or blow out irrigation lines so ice doesn’t crack them. Check string light connections before holiday season and replace any cracked sockets or corroded connectors, they’re safety hazards. Store battery-powered lights indoors over winter if your region gets below freezing: cold kills rechargeable batteries.
Wiring and how to choose outdoor lighting fixtures: When planning hardwired layouts, sketch a rough map and run conduit along existing structures (fence lines, house edge) to minimize visual clutter. How to choose outdoor lighting fixtures for your home takes trial and error, so start with rentable setups or modular solar systems if you’re not committed long-term. Work from the breaker panel outward, and always double-check that power is off before touching any wiring.
Conclusion
Backyard outdoor lighting doesn’t have to be overwhelming. Start with one layer, string lights or path solar stakes, and add from there. Each approach (hardwired, solar, smart, accent) solves different problems, so pick what fits your space and skill level. Take your time with mounting and conduit work: poor prep causes 80% of outdoor lighting failures. A well-lit backyard isn’t just prettier after dark, it’s safer, more functional, and makes you actually use the space.


