
Kitchen island pendant lighting isn’t just about brightening the prep zone, it’s the hardest-working decorative element in the room. The right pendants anchor your island visually, set the tone for the entire kitchen, and actually make cooking and gathering more enjoyable. Whether you’re retrofitting an existing island or building one from scratch, choosing the right fixture style, size, and finish can make the difference between a kitchen that feels finished and one that feels incomplete. Let’s walk through the best kitchen island pendant lighting ideas trending right now, plus the practical know-how to install them correctly.
Table of Contents
ToggleKey Takeaways
- Kitchen island pendant lighting serves as both a functional task light and a decorative anchor that sets the tone for your entire kitchen design.
- Proper height matters: hang pendants 28–32 inches above the counter, spaced 24–30 inches apart (center to center) for balanced task lighting and visual proportion.
- Choose fixtures based on your kitchen style—minimalist designs for modern spaces, industrial for bold character, glass-and-metal combinations for transitional kitchens, and ornate finishes for traditional designs.
- Fixture specifications like brightness (300–500 lumens), materials (matte black, brushed brass, frosted glass), and durability (UL-rated components, SOOW-rated cords) directly impact both safety and performance.
- Statement pendant lighting (16–20 inches diameter) works best on 4–5 foot islands and can be hung slightly lower (24–28 inches) to create intimacy and focus attention on work surfaces.
- Always confirm your junction box can support pendant weight and call a licensed electrician for new electrical infrastructure—DIY shortcuts on electrical work create safety and code compliance risks.
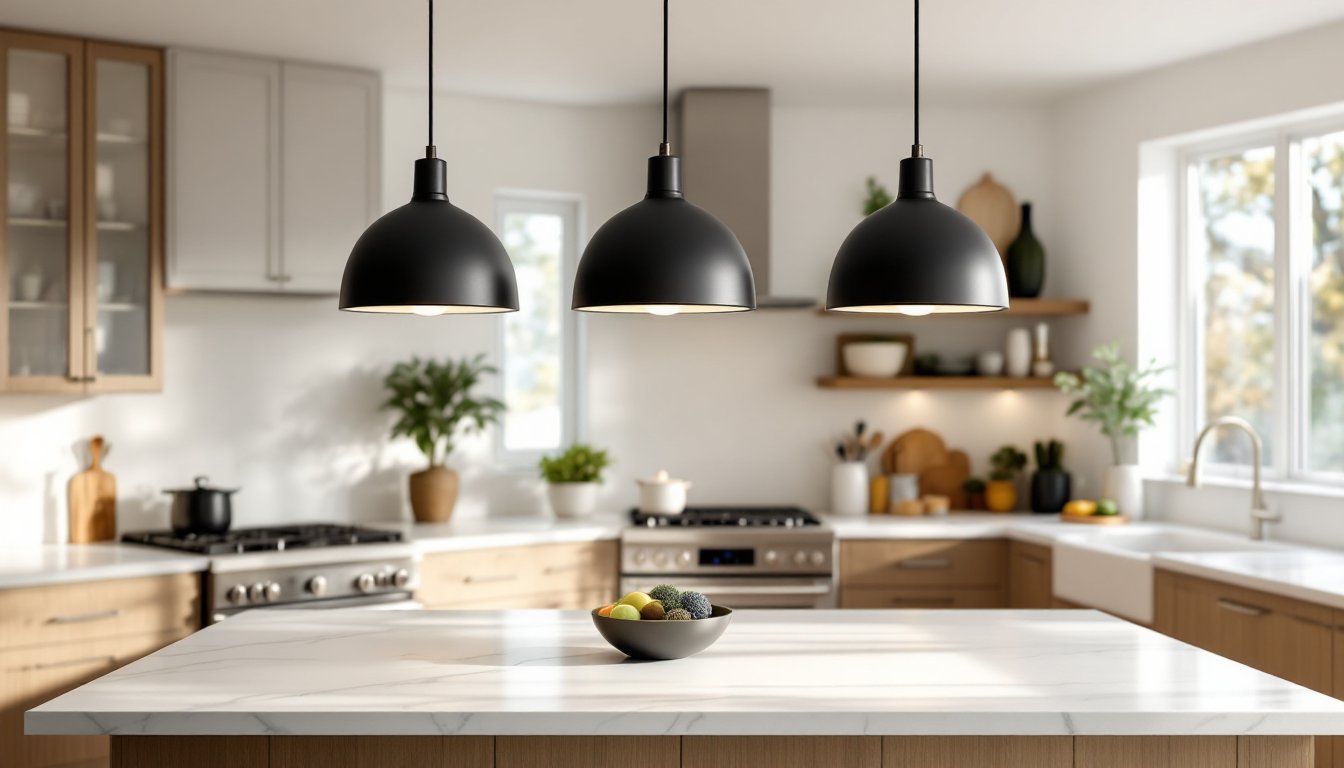
Modern Minimalist Pendant Lights
Clean lines, neutral tones, and simple geometry define minimalist pendants. These fixtures work overtime in contemporary kitchens by staying visually quiet while pulling double duty as task and ambient lighting.
Look for matte black or brushed aluminum fixtures in shapes like spheres, cylinders, or shallow domes. Many homeowners pair 2–3 small minimalist pendants over an island rather than one large fixture. This approach distributes light more evenly and creates visual interest without visual clutter.
Materials matter here. A brushed brass stem paired with a simple opal frosted glass shade filters harsh light and complements both warm and cool color palettes. For task-heavy islands, choose fixtures rated 300–500 lumens per pendant: this gives you ample work light without glare on countertops.
Minimalist pendants pair beautifully with kitchen lighting in Home Depot’s current lineup, which stocks plenty of understated options that won’t compete with patterned backsplash or bold cabinet colors. Installation is straightforward if you already have junction boxes over your island, most minimal pendants use standard 3/8-inch threaded stems and simple cord grips.
Industrial-Style Fixtures for Bold Character
Industrial pendants bring warehouse cool to your kitchen. Think bare Edison bulbs in metal cages, exposed cords, and finishes like oil-rubbed bronze or raw steel that age beautifully over time.
These fixtures demand respect for electrical safety. Always use UL-rated pendant kits and ensure the cord is SOOW rated (oil- and moisture-resistant) if the fixtures hang low. Industrial pendants work best when hung 28–32 inches above the countertop, giving enough clearance for tall servers and creating visual proportion with the island.
Why go industrial? The style pairs naturally with concrete countertops, open shelving, and stainless steel appliances. A three-light industrial cage fixture over a 4-foot island creates bold presence without overwhelming the space. If your island is narrower, a single statement fixture often works better.
One practical note: industrial fixtures with open bulbs generate heat. If you use incandescent Edison bulbs, they’ll warm the kitchen, ideal for cool climates but less so if you live somewhere hot. Consider dimmable LED Edison-style bulbs instead: they run cool and deliver the vintage look without the heat penalty.
Glass and Metal Combinations
Pairing glass shades with metal frames creates visual balance and works across nearly every kitchen style. The transparency of glass prevents the fixtures from feeling bulky overhead, while the metal base provides definition.
Clear glass shades allow the bulb and interior mechanics to remain visible, ideal if you’re using decorative bulbs. Frosted or seeded glass diffuses light more evenly and hides the bulb, creating softer ambiance. Colored glass (amber, smoke, or pale green) adds personality while still filtering light warmly.
Metal finishes deserve equal attention. A powder-coated steel frame in matte black offers durability and hides dust better than shiny finishes. Brass and copper frames warm up neutral kitchens but can clash with cool-toned cabinetry. Stainless steel and brushed nickel work as neutrals that pair with almost anything.
This design approach scales well. A single large glass-and-metal dome pendant (12–14 inches diameter) can anchor a 5-foot island solo, while smaller fixtures (8–10 inches) work better in groups of two or three. Install these pendants using standard E26 or E27 base bulbs: wattage depends on shade thickness and the room’s overall lighting plan. Most homes benefit from 40–60W equivalent LED bulbs for islands.
Statement Pendant Lighting That Stands Out
Sometimes one bold pendant beats three timid ones. Statement fixtures grab attention and establish your kitchen’s personality in one decisive move.
Look for oversized domes (16–20 inches diameter), geometric shapes like hexagons or ribbed cylinders, or ornate fixtures with sculptural appeal. These lights work best on islands 4–5 feet or wider. Hang a statement pendant slightly lower than traditional pendants (24–28 inches above the counter) to create intimacy and focus attention downward onto the work surface.
Color comes into play here. A jewel-tone pendant (deep blue, emerald, or burgundy) becomes a focal point and can coordinate with a kitchen accent color. Alternatively, a neutral statement fixture, like a handblown glass sphere in clear or frosted glass, adds visual interest without fighting for dominance with cabinetry or tile.
Installation considerations: statement pendants are heavier, so confirm your junction box is properly rated for the fixture weight (typically 5–10 pounds). If it’s not, a licensed electrician can reinforce it with a pendant-mounting bracket rated for your fixture’s weight. Don’t improvise here, a pendant crashing onto a granite countertop or someone’s head is a liability and safety issue.
Many homeowners discover statement lighting options through design-focused retailers like Remodelista’s curated pendant selection, which emphasizes both beauty and function.
Spacing, Height, and Installation Basics
Getting placement right separates amateur jobs from professional results. A misaligned pendant catches every eye in the room, for all the wrong reasons.
Hang single pendants centered over the island. For multiple pendants, space them 24–30 inches apart (center to center) so they balance visually and provide even task lighting. Over a 4-foot island, two pendants spaced 12 inches from each end works well. Over a 6-foot island, three pendants spaced evenly or two spaced 18 inches apart both read as intentional.
Standard pendant height is 28–32 inches above the counter. This clears most people’s heads during normal work and keeps the pendants in peripheral vision rather than direct sightline. Lower looks dramatic: higher feels disconnected. If your island has bar seating, account for barstool height, add at least 12 inches of clearance above the highest point of a chair back.
How to Position Pendants Over Your Island
-
Locate existing junction boxes. Most islands have electrical rough-in from the framing stage. If not, you’ll need to run new electrical from the panel or ceiling, hire a licensed electrician if you’re unfamiliar with NEC code.
-
Mark the center point(s) of where you want pendants using a stud finder or voltage tester to confirm the box location.
-
Install a pendant-rated mounting bracket if the junction box requires reinforcement (older homes often do). Secure the bracket with 1/2-inch bolts to ceiling joists, not just drywall.
-
Run the cord or cable through the mounting bracket and secure it with the provided nipple and lock nut. Leave slack for adjustments.
-
Connect the pendant wiring to the house wiring using UL-rated wire nuts (not electrical tape alone). Follow the fixture manual, always attach ground wires (bare copper or green) together.
-
Test for power with a multimeter before fully tightening. Once confirmed, secure the canopy and adjust pendant height so it’s level and at the correct depth above the counter.
If your island has no electrical infrastructure, running new circuits is beyond casual DIY. Call a licensed electrician to route power safely and to code, typically a new 20-amp circuit on 12-gauge wire for island lighting and receptacles.
Matching Your Island Lighting to Your Kitchen Style
Your island pendants should feel like they belong, not like they arrived on a delivery truck and parked in the middle of the room.
Farmhouse and Cottage kitchens: Opt for barn-style shades, cage fixtures, or vintage Edison bulbs. Metal finishes in aged brass, oil-rubbed bronze, or weathered wood-and-metal combinations complement open shelving and white cabinetry.
Contemporary and Modern kitchens: Lean toward clean geometry, minimalist metal frames, and matte finishes. Avoid anything ornate. A single oversized dome or three small spherical pendants in black or brushed aluminum keep the aesthetic uncluttered.
Transitional kitchens (classic with modern touches): Glass-and-metal combos work here perfectly. A frosted glass shade with a brushed nickel or brass frame bridges both worlds, refined but not fussy.
Traditional and Classic kitchens: Consider crystal-accented fixtures, milk glass shades, or brass finishes that echo period details. If your kitchen has crown molding or detailed cabinetry, a moderately ornate pendant complements rather than conflicts.
Design tip: If you’re unsure, pick a pendant finish that echoes your cabinet hardware or faucet finish. A kitchen with brushed nickel fixtures and hardware already tells you brushed nickel pendants belong there. If your cabinetry is bold (deep blue, rich green, or black), let it dominate and choose neutral pendant finishes, white, clear glass, or matte metals.
Reference inspiration from design platforms like The Kitchn, which showcases real kitchens across styles and budgets. Seeing how other homeowners paired their island lighting with cabinetry, counters, and backsplash removes a lot of guesswork and also lighting ideas from Homify that compile residential examples across design categories.
Finally, consider adding under cabinet lighting as a companion to your island pendants. Under-cabinet task lights illuminate countertop work areas while island pendants provide ambient and overhead lighting. Together, they create a balanced, functional kitchen lighting scheme that works for cooking, gathering, and cleaning.
Final Thoughts
Kitchen island pendant lighting is equal parts function and personality. Start by assessing your space’s width, existing electrical infrastructure, and the overall style direction of your kitchen. Choose fixtures that work within those constraints and that you’ll genuinely enjoy seeing every day. When in doubt, prioritize even light distribution and proper height over trendy designs, the best pendant lights are ones that work hard and look good doing it.


