
Kitchen pendant lighting does more than brighten your workspace, it sets the tone for the entire room. Whether you’re renovating a full kitchen or upgrading fixtures above an island, the right pendants tie form and function together seamlessly. In 2026, designers and homeowners are leaning into bold statement pieces, mixed metals, and lighting that actually performs. This guide walks you through modern minimalist designs, rustic farmhouse styles, industrial aesthetics, and the installation fundamentals you need to pull off a professional result.
Table of Contents
ToggleKey Takeaways
- Kitchen pendant lighting serves dual purposes: providing focused task light 30–36 inches above work surfaces while acting as a design focal point that anchors your room’s aesthetic.
- Modern minimalist designs favor matte black metal with frosted glass, while rustic farmhouse styles embrace reclaimed wood and Edison bulbs, and industrial fixtures combine utilitarian frames with warm LED Edison bulbs at 2200K color temperature.
- Proper spacing and height are critical: hang pendants 30–36 inches above islands, use three fixtures for islands wider than 3 feet spaced 24–30 inches apart, and always secure to solid ceiling joists rather than drywall anchors alone.
- Kitchen pendant lighting installation requires checking 20-amp circuit capacity, using 12-gauge wiring, and installing a dimmer switch (costing $15–30) to adjust ambiance from task lighting to mood lighting.
- Fixtures installed over water sources must be rated for damp locations per the National Electrical Code, and modern LED Edison bulbs use only 6 watts while lasting 15,000 hours—a major upgrade from older incandescent versions.
Why Kitchen Pendant Lighting Matters
Pendant lights serve a practical purpose: they illuminate countertops, islands, and dining areas where overhead ceiling fixtures alone fall short. But they’re equally important as a design anchor. A well-placed pendant catches the eye and becomes a focal point, especially when hung over kitchen islands or bar seating.
Beyond aesthetics, pendants provide task lighting where you need it most. If you’re chopping vegetables or reading recipes, overhead fluorescents often cast shadows. Pendants hung 30 to 36 inches above a work surface deliver focused light without glare. They also work well in combination with under-cabinet strips or ambient ceiling lights, creating a layered lighting scheme that mimics natural daylight and reduces eye strain.
One more thing: pendants are one of the quickest wins in kitchen upgrades. You don’t need to rewire or move outlets in most cases, especially if you’re replacing existing fixtures. The visual impact-to-effort ratio is hard to beat, which is why so many homeowners start here.
Modern Minimalist Pendant Designs
Sleek Metal And Glass Options
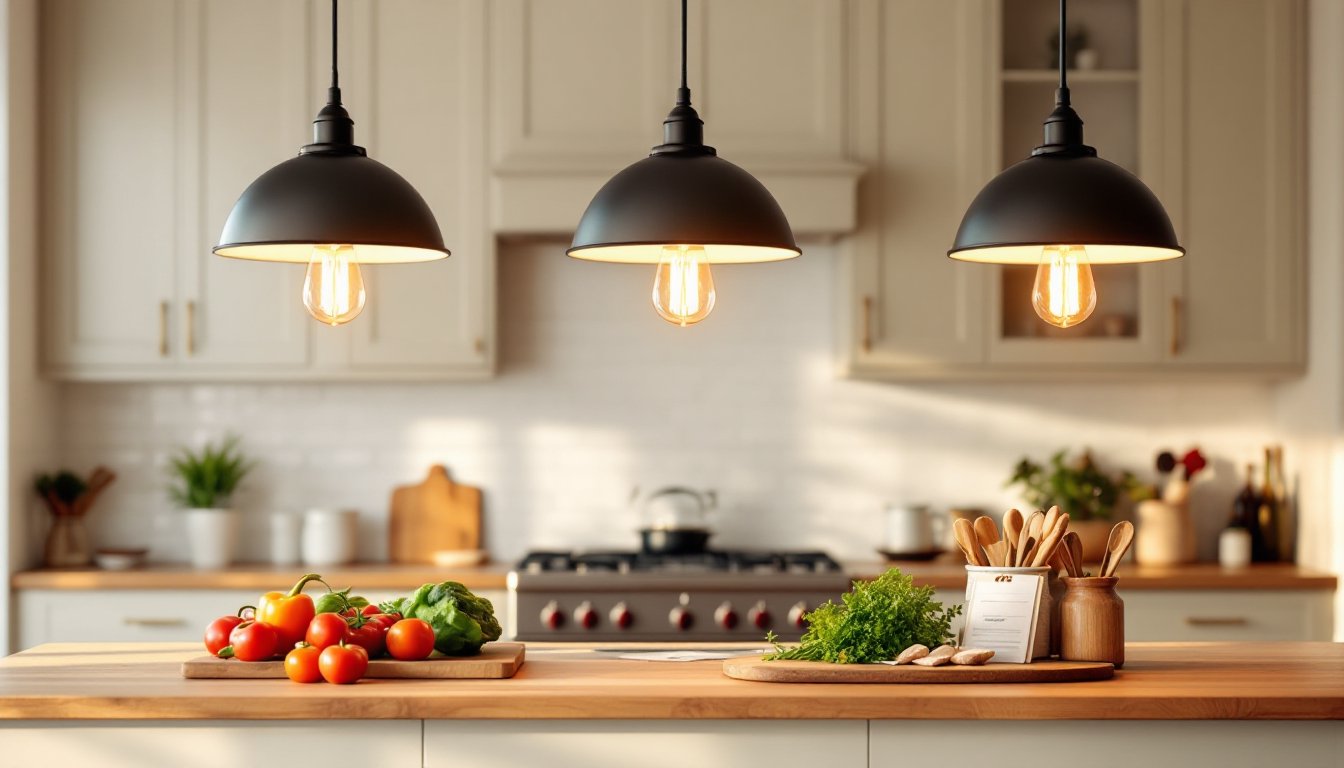
Minimalist pendants embrace clean lines, neutral tones, and high-quality materials. Think matte black metal with frosted glass, brushed nickel with clear cylinders, or even bare Edison bulbs wrapped in geometric wire frames. These designs work especially well in kitchens with white subway tile, light wood cabinetry, or concrete countertops.
Matte black metal and frosted glass combos are everywhere in 2026 because they’re versatile, they complement both warm and cool color palettes. The frosted diffuser keeps light soft and non-directional, reducing harsh shadows. A typical setup uses three pendants spaced evenly over a 4-foot island, each with a 12-inch diameter globe.
Brushed nickel or chrome finishes offer a lighter aesthetic. These metals reflect light gently and pair well with stainless steel appliances. If you’re going ultra-minimalist, consider adjustable pendant cords (sometimes called rise-and-fall fixtures) so you can lower the light for task work and raise it for entertaining.
One consideration: glass and metal pendants show dust and fingerprints. Plan to wipe them down monthly. If you prefer low maintenance, look for fixtures with solid acrylic or polycarbonate diffusers instead, they’re nearly as clean-looking and far more forgiving.
Rustic And Farmhouse Pendant Styles
Rustic pendants lean into warmth and character. Reclaimed wood, mason jar shades, wrought iron brackets, and Edison-style filament bulbs define this category. These fixtures suit kitchens with shiplap walls, open shelving, or vintage color palettes like sage green or warm cream.
Barn-style pendants with metal cages and exposed bulbs are classics for good reason, they provide soft, ambient light while making a bold design statement. Pairing three barn-style fixtures over a farmhouse island creates cottage-meets-modern appeal. The exposed filament isn’t just ornamental: it’s functional. A 60-watt equivalent warm-white LED (2700K color temperature) mimics candlelight without the fire hazard or electricity waste.
Mason jar pendants are another farmhouse staple. Real or replica mason jars mounted in metal holders and fitted with standard socket adapters bring nostalgic charm. They work best in kitchens with a casual, lived-in feel. One heads-up: if you’re using actual glass jars, ensure the electrical connections are solid and moisture-resistant. Kitchens get humid, and water-damaged sockets are a fire risk.
Wood and metal combos, think reclaimed barn wood paired with oil-rubbed bronze hardware, add texture and depth. These pendants pair beautifully with islands that feature wood bases or tops, creating a cohesive look. The key is balancing rustic elements with clean, modern fixtures to avoid a dated appearance.
Industrial And Edison Bulb Fixtures
Industrial pendant lighting has matured beyond the “warehouse loft” stereotype. Today’s industrial fixtures combine utilitarian design with refined materials and warm lighting. Exposed metal frames, visible wiring, and vintage-inspired Edison bulbs remain central, but modern versions prioritize safety, dimming capability, and energy efficiency.
An industrial pendant typically features a cage or open frame in steel, iron, or aluminum, paired with a bare bulb socket or a simple glass shade. The aesthetic works beautifully in loft-style kitchens, modern farmhouse spaces, and eclectic interiors. Hanging them over a waterfall island or bar counter creates drama without overwhelming smaller kitchens.
Edison bulbs (A19 or A21 styles with 2200K warm-white color temperature) are the soul of industrial design. They project a soft, golden glow that feels inviting at dinnertime. Modern LED Edison bulbs cost 10–15 dollars each, use about 6 watts, and last 15,000 hours, a far cry from incandescent versions that burned out in months.
One practical note: industrial fixtures often use exposed wiring or cloth-wrapped cords, which adds character but requires care. Make sure cords are rated for kitchens (UL-listed and moisture-resistant) and kept away from water sources. If you’re hanging pendants directly over a sink, consider a fixture with a sealed glass shade instead.
Layering is key in industrial kitchens. Combine kitchen pendant lighting ideas with under cabinet lighting to balance dramatic pendants with practical task light. This layered approach keeps the space functional and visually balanced.
Installation Tips For Kitchen Pendants
Before you drill or cut drywall, check your electrical capacity. Most kitchens run on 20-amp circuits, and pendants typically draw minimal power, a standard 40-watt equivalent LED uses less than 10 watts. But, if you’re wiring multiple new pendants onto an existing circuit that’s already handling countertop outlets, microwave, and refrigerator, you might hit your limit. Call a licensed electrician if you’re uncertain. This is not a guess-and-go situation.
Spacing and height matter. For island pendants, hang fixtures 30 to 36 inches above the work surface. If your island is wider than 3 feet, use three pendants instead of two, uneven spacing looks accidental. Space them 24 to 30 inches apart. Test the layout by taping paper shapes to your ceiling and viewing them from standing height and seated positions before making any holes.
Use a stud finder to locate ceiling joists or blocking. Pendants need solid support: drywall anchors alone won’t do. If you’re replacing an existing fixture, the old electrical box might be in the right spot, use it. If you’re installing in a new location, you’ll likely need to install a pancake electrical box secured to a joist (nominal 2×10 joist is standard: actual depth is 9.25 inches).
Wiring should be 12-gauge wire for 20-amp circuits (check local code: rules vary). Run the wire through the ceiling cavity to an accessible switch or dimmer. A dimmer switch is highly recommended for kitchen pendants, it lets you adjust ambiance from full brightness for cooking to soft evening mood lighting. Standard dimmers cost $15–30 and work with most LED bulbs (check compatibility before buying).
Trim excess cord or chain with cable ties or clips rated for your fixture type. Loose wire swinging in the ceiling looks sloppy and risks damage. Once wired, test the fixture before finalizing the mounting hardware. Flip the switch, does it light? No buzzing or flickering? Good. If there’s a hum or flicker, the bulb or dimmer might not be LED-compatible: swap it out.
For installations over water (islands with sinks, for example), use fixtures rated for damp locations per the National Electrical Code (NEC). These have sealed wiring and moisture-resistant components. Finally, use appropriate mounting hardware for your ceiling type, toggle bolts for hollow ceilings, lag bolts into joists for solid wood. A mismatched mounting is the fastest way to a pendant crashing down mid-dinner party.
Conclusion
Kitchen pendant lighting transforms both function and style. Whether you choose sleek modern designs, rustic farmhouse charm, or industrial edge, the key is selecting fixtures that work with your existing décor while delivering the task light you need. Proper installation, checking electrical capacity, spacing fixtures correctly, and securing them to solid support, ensures your pendants look great and stay safe for years. Start by sketching your layout, measure twice, and don’t hesitate to call a pro if wiring feels uncertain. The result is a kitchen that’s both beautiful and genuinely easier to cook and entertain in.


