
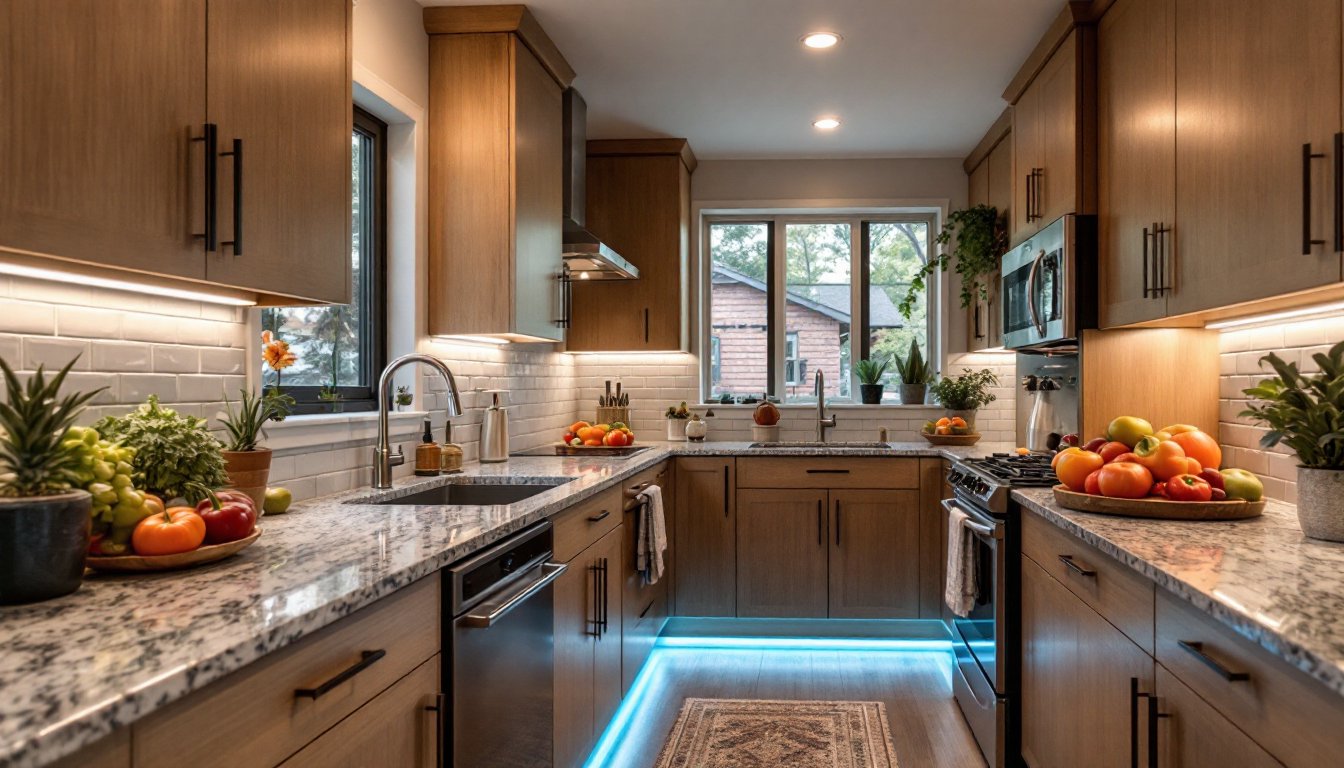
Under cabinet lighting is one of the smartest kitchen upgrades you can tackle, it brightens work surfaces where overhead fixtures fall short, makes your space feel bigger, and cuts energy costs without very costly. LED under cabinet lighting has become the go-to choice for homeowners and DIY enthusiasts because it delivers reliable illumination, runs cool, and lasts for years without constant bulb replacements. Whether you’re prepping dinner or just need better visibility for those detailed tasks, kitchen under cabinet lighting transforms both the function and feel of your cooking space. In this guide, we’ll walk you through the basics, installation methods, and practical tips to get your under cabinet setup working perfectly.
Table of Contents
ToggleKey Takeaways
- LED under cabinet lighting eliminates shadows on work surfaces, consumes 75% less energy than incandescent bulbs, and lasts 25,000–50,000 hours, making it a cost-effective kitchen upgrade.
- Choose between puck lights for targeted illumination ($15–$40 each) or linear strips for even coverage across long countertops ($30–$100 per 16-foot roll), depending on your cabinet layout and budget.
- Installation options range from plug-in systems requiring no wiring, to hardwired setups for seamless wall-switch control, to battery-powered alternatives ideal for renters testing layouts.
- Proper spacing—12–18 inches apart for puck lights or full coverage with linear strips—prevents dark zones and ensures professional-looking results.
- Maintain brightness by dusting fixtures every 1–2 months, use LED-compatible dimmers, and address common issues like flickering (power supply problems) or uneven brightness (add fixtures or switch to continuous strips).
- Under cabinet kitchen lighting transforms both functionality and aesthetics, whether you choose a DIY plug-in system or hire an electrician for hardwired installation ($150–$300).
Why LED Under Cabinet Lighting Is Worth the Investment
LED under cabinet lighting solves real problems. Task lighting on countertops eliminates shadows when you’re chopping vegetables, reading recipes, or checking your knife work, areas where ceiling lights often leave you working in your own shadow. Kitchen under cabinet lighting also creates ambient warmth, making the space feel intentional and polished without requiring a full renovation.
From an efficiency standpoint, LEDs consume about 75% less energy than incandescent bulbs and last 25,000 to 50,000 hours (roughly 10–20 years of typical daily use). That means fewer trips to the hardware store and lower electric bills. Because LEDs run cool, they don’t radiate heat into your cabinet interiors, which is especially important if you store plastic containers or dry goods nearby.
Installation difficulty varies, but most LED under cabinet systems are homeowner-friendly. LED Home Lighting Fixtures include mounting hardware and simple wiring, and plug-in options require zero electrical knowledge. Even hardwired setups often involve straightforward connections if you follow code and use proper safety precautions.
Types of LED Under Cabinet Lighting Systems
Understanding your options helps you pick the right solution for your kitchen. LED under cabinet systems fall into two main categories: puck lights and linear strips, each with distinct benefits for different layouts and budgets.
Puck Lights and Linear Strips Explained
Puck lights are small, round or square fixtures that sit under your cabinets and cast downward in a concentrated beam. Think of them like tiny spotlights spaced along your counter. Pucks work well for kitchens with limited undercabinet depth and when you want to highlight specific work zones. They’re typically 2–3 inches wide, draw about 3–5 watts per unit, and cost $15–$40 each. The trade-off is that you’ll need more fixtures to cover a long countertop evenly, and spacing them properly prevents dark gaps.
Linear strips (also called tape lights or channel lights) run in continuous lines beneath your cabinets. They deliver even, uninterrupted illumination across the entire length and are ideal for long kitchen counters. Strips come in rolls, typically 16 feet per roll, and consume 7–12 watts per linear foot. Installation is simpler visually because there are no gaps, and you cut them to fit your exact dimensions. Modern strips often come with adhesive backing and are dimmable, so you can adjust brightness for mood or task. They cost roughly $30–$100 for a 16-foot roll, depending on color temperature and smart-home features.
Both types come in different color temperatures: 2700K (warm white) mimics incandescent and suits dining areas, while 4000K (neutral white) and 5000K (cool white) are better for task lighting where you need sharp visibility. Under Cabinet Lighting Home retailers stock both styles, so you can compare in person before buying.
Installation Methods: Hardwired vs. Plug-In Options
Your electrical setup and comfort level should guide this choice. Plug-in LED under cabinet lighting is the easiest route: you attach the fixtures to your cabinet undersides using adhesive strips or small brackets, then plug them into a standard outlet. No wiring, no permits required. Drawback? You’ll see a power cord, and you’re limited to locations near an outlet. Cord management behind an appliance or along the backsplash helps hide the cable.
Hardwired systems require you to connect lights directly to your home’s electrical circuit, often through a junction box or switch. This is cleaner aesthetically and gives you the option to control lights with a wall switch or smart home integration. The catch: you’ll need to run wire through your cabinets, install a junction box, and possibly pull a permit, local electrical codes vary by jurisdiction. If you’re uncomfortable with basic wiring, hire a licensed electrician for this step: it’s worth the $150–$300 cost to ensure safety and code compliance.
Mid-tier option: battery-powered LED strips with remote controls. No plug, no wiring, just stick them on and go. Battery life is decent (6–12 months), and they’re perfect for renters or if you’re testing a layout before committing. The trade-off is you’ll replace batteries periodically, and brightness is sometimes less impressive than hardwired or plug-in options.
When planning under cabinet kitchen lighting, measure your cabinet run length first, confirm outlet locations, and decide whether you want dimming or smart controls (many modern LEDs support both, but hardwired setups integrate more seamlessly).
Planning Your LED Under Cabinet Layout
Proper spacing makes all the difference between professional-looking lighting and an amateur patchwork. Start by measuring the total length of your counter run in inches. If using puck lights, space them 12–18 inches apart for even coverage: closer spacing ensures no dark zones, but 18 inches is often sufficient. For linear strips, buy enough footage to cover your entire run with 2–3 inches of overlap at seams (strips often have designated cut points for easy trimming).
Check cabinet depth: most undercabinet fixtures mount 3–4 inches below the cabinet lip. This angle prevents the light from hitting your eyes and throws illumination onto the countertop surface, not your face or the backsplash. Avoid positioning lights too far back (into the cabinet) or too far forward (over the counter edge).
Consider outlet and switch placement. If hardwiring, locate your circuit breaker and plan the safest wire route, you’ll typically run cable through or along cabinet frames. For plug-in systems, make sure an outlet is accessible and not hidden behind a large appliance: a switched outlet (one you control with a wall switch) adds convenience if available.
Before installing, clean the undersurface of your cabinets thoroughly with degreaser and let dry completely. Dust and grease prevent adhesive strips from bonding securely. Using 12 Volt LED Lighting systems? Confirm your power supply matches the system specifications to avoid compatibility issues.
Essential Maintenance and Troubleshooting Tips
LED under cabinet lighting is low-maintenance, but a few habits extend its lifespan. Dust accumulates on fixtures and reduces brightness, so wipe them down every 1–2 months with a dry microfiber cloth or soft brush. If you have a dimmer switch, avoid using standard dimmer switches with LEDs unless the package explicitly says they’re compatible, many older dimmers cause flickering with LED strips.
Common issues and fixes:
• Flickering lights: Usually a power supply or dimmer compatibility problem. Switch to a LED-rated dimmer or check that your power adapter isn’t failing.
• Uneven brightness: Puck lights spaced too far apart leave gaps. Add another fixture between problem areas, or switch to a continuous linear strip.
• Adhesive failure: High kitchen heat or humidity can loosen adhesive strips. Clean the surface with rubbing alcohol, let dry, and reapply. For permanent mounting, small screws or mounting brackets are more reliable than adhesive alone.
• Spots where light doesn’t reach: Reposition fixtures slightly forward or adjust mounting angle if possible. Test before securing permanently.
If you’re having trouble, step-by-step tutorials on sites like Instructables and Family Handyman cover LED installation troubleshooting in detail. For hardwired systems that won’t turn on, check the circuit breaker first, a tripped breaker is the easiest culprit.
Conclusion
LED under cabinet lighting is a high-return DIY project that improves both function and aesthetics. Whether you choose simple plug-in strips, battery-powered pucks, or a hardwired professional install, better task lighting transforms how you use your kitchen. Start with a clear layout, pick the right fixture type for your space, and don’t skip the prep work. Your countertops, and your eyesight, will thank you.


