
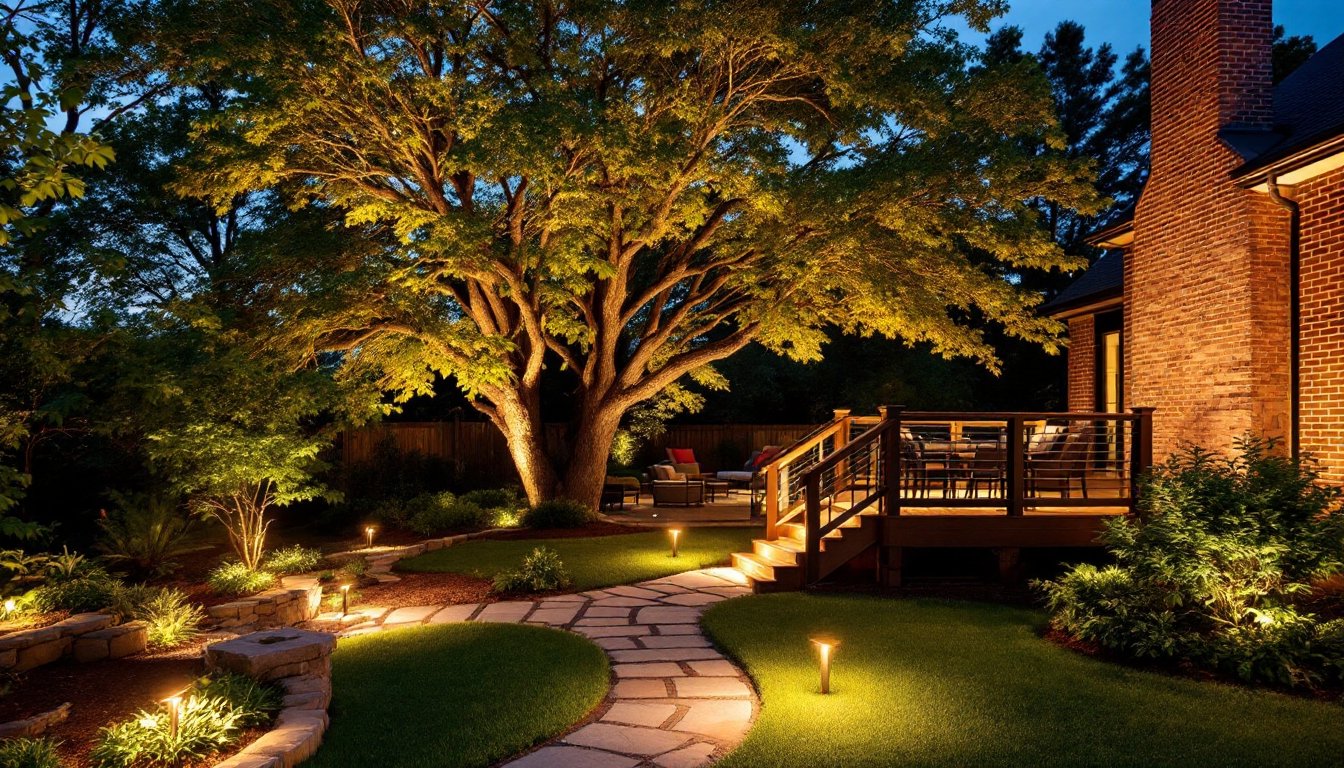
When the sun dips below the horizon, most yards go dark, literally and figuratively. But outdoor accent lighting changes that equation entirely. A well-placed uplight washing across a brick facade, a series of warm pathway lights guiding visitors, or spotlights highlighting a mature tree transform an ordinary backyard into an evening destination. Outdoor accent lighting isn’t just about visibility: it’s about creating atmosphere, defining spaces, and extending the usability of your yard long after sunset. Whether you’re working with a modest patio or sprawling landscape, the right approach to accent lighting elevates your home’s curb appeal and creates those Instagram-worthy moments without the pretense.
Table of Contents
ToggleKey Takeaways
- Outdoor accent lighting highlights architectural features and landscape elements to create depth, atmosphere, and visual interest in your yard after sunset.
- Uplighting and downlighting techniques work best with warm color temperatures (2700K or lower) and LED fixtures that consume 80% less energy than older halogen options.
- Start by identifying focal points like mature trees or stone features, then layer different fixture types—spotlights, pathway lights, and deck accents—to create professional visual hierarchy and prevent over-lighting.
- Low-voltage systems (12V or 24V) are safer and easier to install than line-voltage wiring, requiring only a transformer and buried cable along garden edges.
- Mock up your accent lighting placement using portable LED lights before permanent installation to avoid glare, unflattering shadows, and the appearance of unintentional design.
- Begin with one or two key accents and expand gradually, as outdoor accent lighting investments pay dividends by extending your yard’s usability and boosting curb appeal long-term.
What Is Outdoor Accent Lighting and Why It Matters
Outdoor accent lighting serves a specific purpose: to highlight architectural features, landscape elements, or functional zones rather than illuminate broad areas. Unlike general outdoor lighting (which floods a deck or driveway with uniform light), accent lighting draws attention to what you want people to notice, a stone wall, a specimen tree, or a seating area.
Why does this matter? Accent lighting creates depth, dimension, and visual interest in your yard. It makes spaces feel intentional and designed, even if you’re working on a shoestring budget. When homeowners think through accent lighting strategically, they recoup that investment not just in aesthetics but in extended outdoor living seasons and improved safety. Shadows and silhouettes created by accent lighting also add drama and intimacy that broad floodlighting can never achieve. Think of accent lighting as the seasoning that brings the whole meal together, it’s not the main course, but it transforms the experience.
Types of Outdoor Accent Lighting Fixtures to Consider
Uplighting and Downlighting Techniques
Uplighting is one of the most versatile accent tools. A light source positioned at ground level shining upward creates drama, reveals texture, and makes architectural features pop. Uplighting a stone wall, stucco facade, or tree canopy is nearly foolproof: the contrast between lit and unlit areas creates the visual punch.
Downlighting works the opposite direction. A fixture mounted overhead (on a soffit, pergola, or tall post) casts light downward, perfect for illuminating planting beds, small seating nooks, or outdoor accent lighting features beneath eaves. Downlighting is also safer for pathway areas because it mimics natural light direction. The trade-off: it can create harsh shadows if not positioned correctly, so test placement before installing permanently.
Warm color temperature (2700K or lower) works best for accent lighting in residential yards. It feels inviting and doesn’t attract insects like cooler tones do. Most outdoor accent lights now come in LED form, which cuts energy use by 80% compared to older halogen fixtures and lasts 25,000+ hours.
Spotlights, Pathway Lights, and Deck Accents
Spotlights are concentrated, directional fixtures that beam a tight cone of light, ideal for highlighting a focal point across distance. A 15–30-watt LED spotlight can pick out a flowering tree or garden sculpture from 20+ feet away. Look for fixtures with adjustable focus and swivel mounts for flexibility during installation.
Pathway lights serve double duty: they light the walking surface and act as visual accents that define garden edges or guide visitors. Solar pathway lights eliminate wiring hassles, though their output is modest and weather-dependent. Low-voltage hardwired pathway lights (12V systems) offer consistent brightness and longer-term reliability. Standard spacing is 3–5 feet apart along walkways.
Deck accents include rail lights, post cap lights, and soffit-mounted strips. Rail lights mounted on deck railings create subtle ambient lighting and prevent tripping hazards. Post cap lights sit atop railing newels and provide vertical visual interest. These tend to be lower-wattage but accumulate impact when used in series. Kitchen Lighting Home retailers and outdoor specialty shops stock countless fixture styles, so you’ll find options fitting any design aesthetic.
Design Tips for Creating Visual Impact
Start by identifying focal points in your yard. That mature oak tree, the stone chimney, the water feature, these are your accent anchors. Once you know what you want to emphasize, plan lighting around those elements, not randomly throughout the space.
Layering is key to professional-looking outdoor lighting. Combine different fixture types and intensity levels, uplighting on the tree, softer pathway lights guiding the route, and maybe a spotlight on an architectural detail. This creates visual hierarchy and prevents the yard from feeling flat or washed out.
Color temperature consistency matters more than people realize. Mix 2700K warm white and 3000K neutral white lights in the same space, and the yard feels disjointed. Choose one temperature across all accent lights for cohesion. Avoid mixing LED and older halogen/incandescent fixtures if they’ll be visible together: the color shift is noticeable.
Spacing and positioning require some trial. Before committing to permanent installation, use portable LED lights or work lights to mock up placement. Watch how the light looks from your main viewing area (usually the back door or patio) and from the yard itself. Glare is the enemy of good accent lighting, if you can see the light source directly, it’s poorly positioned. Shadows matter too. A light positioned at a harsh angle casts unflattering shadows on facades: small adjustments shift light direction dramatically.
Accents should complement, not compete. If your house is the star, accent lighting highlights supporting players. Over-lighting turns a serene yard into a sports stadium. Living Room Home design principles like balance and restraint apply equally outdoors.
Installation and Practical Considerations
Low-voltage systems (12V or 24V) are the standard for most residential outdoor accent lighting. They’re safer than line-voltage (120V) wiring, easier to install without an electrician, and more forgiving if you make mistakes. A transformer steps down household voltage, and buried cable connects fixtures. Buried cable should run in a shallow trench (4–6 inches deep) along garden edges or under mulch to protect it from damage.
Hardwired systems require burying PVC conduit and running 12-gauge or 10-gauge copper wire through it. This approach is more labor-intensive upfront but offers better longevity and consistent performance. Many municipalities don’t require permits for low-voltage lighting, but check your local code. Structural or load-bearing alterations always need permits.
Solar pathway lights require zero wiring but perform inconsistently. They charge during the day and run at night, but cloudy seasons, shade from trees, and age degrade their brightness. Budget 5–7 years before replacing them. If reliability matters, skip solar for critical pathway areas.
Tools you’ll need depend on your approach. For low-voltage buried cable: a spade for trenching, a fish tape if running cable through conduit, and basic hand tools (wire strippers, crimpers, screwdrivers). For hardwired systems, you may rent a trencher. Always call 811 or your local utility locate service before digging, hitting a gas line or electric cable ruins your weekend and your wallet.
Safety first: Wear work gloves when handling cable and fixtures. If you’re uncomfortable working with electricity, even low-voltage systems, hire a licensed electrician. It’s money well spent for peace of mind. Test your system before burying cable: a failed connection discovered after trenching is frustrating.
For design inspiration, resources like Gardenista’s spotlight and floodlight guide and Better Homes & Gardens showcase real-world examples and fixture options. Country Living also features outdoor lighting ideas for rural and farmhouse settings. Browse Ceiling Lighting Home Office concepts, many indoor principles translate outdoors.
Maintenance is light but essential. Clean fixtures twice yearly to remove dust and debris that dims output. Check cable connections annually, especially after winter, to catch corrosion early. LED bulbs outlast fixtures themselves, so replacement is rare: if a light stops working, the transformer or wiring is usually at fault, not the bulb.
Conclusion
Outdoor accent lighting transforms yards from dark voids into layered, inviting spaces. By identifying focal points, choosing the right fixture types, and planning placement carefully, you’ll create an evening oasis that feels intentional and beautiful. Start with one or two key accents, a tree uplight and a pathway, then expand as your budget and comfort level grow. The investment pays dividends every evening your family spends outside.


